In 2016 I reversed Apple’s EFI firmware password reset scheme using SCBO files. There was an old rumor that these files were able to unlock firmware password locked Macs (and even a sketchy video about a universal SCBO able to unlock any Mac). That post is available at Apple EFI firmware passwords and the SCBO myth.
All the interesting computing action happened at the EFI execution level. I made good reversing progress with static analysis, but dynamic analysis with a debugger would make the job much easier. I love debuggers because they allow you to quickly test ideas and cut corners while reversing a target. Reading disassembly listings for long periods is tiring. (U)EFI debuggers can be found in the market but they are usually quite expensive (a couple thousand USD).
My solution was to create an emulator and debugger based on Unicorn. At the time I was working a lot with Unicorn so it was natural to use it to solve this problem (“if all you have is a hammer, everything looks like a nail”). After I wrote the blogpost some people directed me to some emulators (TianoCore EmulatorPkg and efiperun). I never tried them to see if they contained an interactive debugger like I wanted. The pain wasn’t big since this was a couple of days project and it was quite fun to write.
For different reasons I never released the code and three years later it is finally time to do it and explain how it was built. The main driver was “I want things working ASAP” so code quality isn’t the best and security is almost nonexistent (C is a lot more fun when you don’t care about security - that takes time and energy to implement). I spent some time cleaning up the code and fixing a few bugs found while writing this post.
The debugger has a gdbinit appearance and most cli commands are copied from gdb. gdb command syntax is far from perfect but still far better than LLDB.

The posted code isn’t a generic EFI emulator. This is not an impossible mission (keep reading) but I think that is a waste of time and effort. It is more efficient to solve the problems posed by specific targets you want to debug rather than to solve all problems before you even start.
The main goal of this post is to show you how to solve emulation problems related to EFI and Unicorn. On top of this codebase it is very easy to solve other problems and extend the concept to other targets. For example, I used this code to build a macOS kernel extension (kext) emulator and debugger. The target was an obfuscated/encrypted kext and debugging it this way is easier because of some code stepping complications in remote kernel debugging.
The research was done with MacBook Pro 8,2, which is already an old system. So firmware version is also old and doesn’t contain updates to Apple’s EFI (lots of changes did happen). This shouldn’t invalidate most techniques described here, it just might need extra reverse engineering work to understand how to emulate any newer features.
The problem and its environment
Again, my goal was to reverse engineer the scheme that allegedly allowed Mac firmware passwords to be reset using a SCBO file. You can read about the whole reverse engineering process here. Judging from public descriptions and my own knowledge, it was obvious that everything was happening at EFI level, more specifically, at the DXE phase.
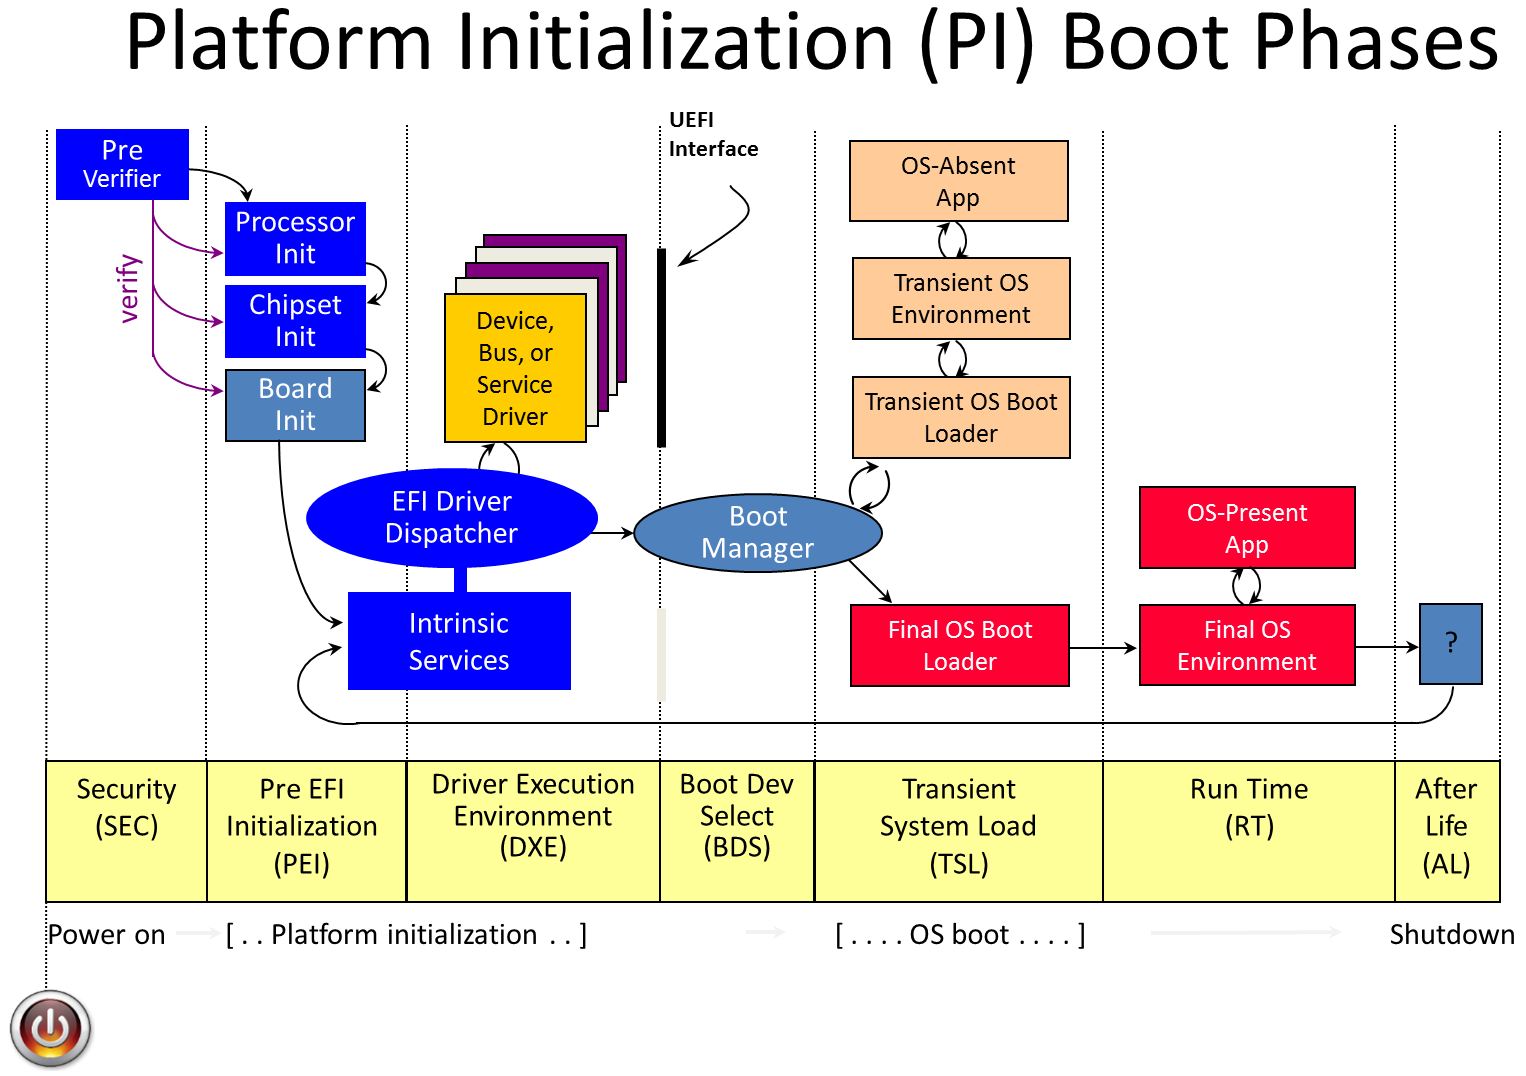
The DXE phase is the last EFI initialization before control is passed off to the boot loader and the operating system is finally booted. This is the richest EFI initialization phase, with lots of drivers and services initialized. The runtime is rich enough to run Tetris and other games. As reference you can use my EFI Monsters slides, where I explain bits and pieces of the EFI world.
While all this code is running before we have an operating system booted and loaded, it is still x86 code (16, 32, and 64 bit), using PE file format (more specifically TE, PE32, PE32+). We could build a special loader and run one of these binaries as a Windows user process, or we could build another loader to run these binaries as macOS or Linux processes. It’s just x86 code after all, encapsulated in a specific file format. If we could map the code and fix up whatever is needed specific to each platform, the code would be executed. This is precisely what we are going to do but inside the Unicorn emulator platform.
Unicorn
Unicorn describes itself as:
Unicorn is a lightweight multi-platform, multi-architecture CPU emulator framework.
It’s basically a scriptable CPU emulator based on QEMU. It is more flexible and faster to setup than QEMU, and can run arbitrary pieces of code (for example, emulate shellcode snippets or string decryption routines extracted from binaries). If C isn’t your favorite language there are bindings for several other languanges.
You can find a Unicorn vs QEMU comparison here.
Unicorn is a great tool and I have written a few tools based on it to assist in reverse engineering processes. The list of tools written using it is already extensive.
Personally I like how easy it is to create a small program to emulate a piece of binary code and instrument it. It is not perfect, but with some creativity it is possible to workaround its problems and achieve what we want.
Unicorn Memory Layout
Whatever memory is needed for emulation must be previously allocated (mapped to be more specific). In this case we need to map memory inside Unicorn emulator for the executable binaries, stack and heap areas, EFI related system tables, and trampolines (more on this later on).
To simplify all this and because Unicorn demands 4K page aligned addresses I have created below’s well defined and separate memory areas.
#define EXEC_ADDRESS                0x10000000
#define EXEC_SIZE             64 * 1024 * 1024
#define STACK_ADDRESS               0x20000000
#define STACK_SIZE             8 * 1024 * 1024
#define EFI_SYSTEM_TABLE_ADDRESS    0x30000000
#define EFI_SYSTEM_TABLE_SIZE  2 * 1024 * 1024
#define EFI_HEAP_ADDRESS            0x40000000
#define EFI_HEAP_SIZE         64 * 1024 * 1024
#define EFI_TRAMPOLINE_ADDRESS      0x50000000
#define EFI_TRAMPOLINE_SIZE        1024 * 1024
The Unicorn API required for this task is the following:
/*
 Map memory in for emulation.
 This API adds a memory region that can be used by emulation.

 @uc: handle returned by uc_open()
 @address: starting address of the new memory region to be mapped in.
    This address must be aligned to 4KB, or this will return with UC_ERR_ARG error.
 @size: size of the new memory region to be mapped in.
    This size must be multiple of 4KB, or this will return with UC_ERR_ARG error.
 @perms: Permissions for the newly mapped region.
    This must be some combination of UC_PROT_READ | UC_PROT_WRITE | UC_PROT_EXEC,
    or this will return with UC_ERR_ARG error.

 @return UC_ERR_OK on success, or other value on failure (refer to uc_err enum
   for detailed error).
*/
UNICORN_EXPORT
uc_err uc_mem_map(uc_engine *uc, uint64_t address, size_t size, uint32_t perms);
Once all memory areas are mapped we can finally write to emulator memory. Don’t forget the important Unicorn address alignment requirement: This address must be aligned to 4KB, or this will return with UC_ERR_ARG error.
Unicorn Hooks
Unicorn hooks are one of its features that make a difference. They allow us to monitor/trace code execution, errors, and even modify code execution (with some caveats). The following Unicorn enum describes the available hooks:
// All type of hooks for uc_hook_add() API.
typedef enum uc_hook_type {
    // Hook all interrupt/syscall events
    UC_HOOK_INTR = 1 << 0,
    // Hook a particular instruction - only a very small subset of instructions supported here
    UC_HOOK_INSN = 1 << 1,
    // Hook a range of code
    UC_HOOK_CODE = 1 << 2,
    // Hook basic blocks
    UC_HOOK_BLOCK = 1 << 3,
    // Hook for memory read on unmapped memory
    UC_HOOK_MEM_READ_UNMAPPED = 1 << 4,
    // Hook for invalid memory write events
    UC_HOOK_MEM_WRITE_UNMAPPED = 1 << 5,
    // Hook for invalid memory fetch for execution events
    UC_HOOK_MEM_FETCH_UNMAPPED = 1 << 6,
    // Hook for memory read on read-protected memory
    UC_HOOK_MEM_READ_PROT = 1 << 7,
    // Hook for memory write on write-protected memory
    UC_HOOK_MEM_WRITE_PROT = 1 << 8,
    // Hook for memory fetch on non-executable memory
    UC_HOOK_MEM_FETCH_PROT = 1 << 9,
    // Hook memory read events.
    UC_HOOK_MEM_READ = 1 << 10,
    // Hook memory write events.
    UC_HOOK_MEM_WRITE = 1 << 11,
    // Hook memory fetch for execution events
    UC_HOOK_MEM_FETCH = 1 << 12,
    // Hook memory read events, but only successful access.
    // The callback will be triggered after successful read.
    UC_HOOK_MEM_READ_AFTER = 1 << 13,
    // Hook invalid instructions exceptions.
    UC_HOOK_INSN_INVALID = 1 << 14,
} uc_hook_type;
For example, to trace every executed instruction we just need to add a UC_HOOK_CODE type hook that prints all executed addresses and instruction strings. To obtain the strings we need to read the instruction bytes, disassemble and finally print the instruction. It is also possible to dump register context - all the registers or just a specific register. Basically every time the registered callback is executed we can take a peek at current virtual CPU state.
The UC_HOOK_MEM_UNMAPPED is also very useful because it is triggered every time code running inside the emulator hits unmapped memory addresses. For example this can be used to detect addresses used by the target binaries that we forgot to map or NULL pointer dereferences. Typical debugger watchpoints can also be implemented by hooking memory read/write/execute events - this generates a callback event every time a certain memory region is read or written, and can detect execution in specific code regions.
Hook callbacks are registered using uc_hook_add:
/*
 Register callback for a hook event.
 The callback will be run when the hook event is hit.

 @uc: handle returned by uc_open()
 @hh: hook handle returned from this registration. To be used in uc_hook_del() API
 @type: hook type
 @callback: callback to be run when instruction is hit
 @user_data: user-defined data. This will be passed to callback function in its
      last argument @user_data
 @begin: start address of the area where the callback is effect (inclusive)
 @end: end address of the area where the callback is effect (inclusive)
   NOTE 1: the callback is called only if related address is in range [@begin, @end]
   NOTE 2: if @begin > @end, callback is called whenever this hook type is triggered
 @...: variable arguments (depending on @type)
   NOTE: if @type = UC_HOOK_INSN, this is the instruction ID (ex: UC_X86_INS_OUT)

 @return UC_ERR_OK on success, or other value on failure (refer to uc_err enum
   for detailed error).
*/
UNICORN_EXPORT
uc_err uc_hook_add(uc_engine *uc, uc_hook *hh, int type, void *callback,
        void *user_data, uint64_t begin, uint64_t end, ...);
The callback function prototype depends on the hook type. For example the UC_HOOK_CODE hook callback:
/*
  Callback function for tracing code (UC_HOOK_CODE & UC_HOOK_BLOCK)

  @address: address where the code is being executed
  @size: size of machine instruction(s) being executed, or 0 when size is unknown
  @user_data: user data passed to tracing APIs.
*/
typedef void (*uc_cb_hookcode_t)(uc_engine *uc, uint64_t address, uint32_t size, void *user_data);
A simple code tracer callback is something as simple as:
void
hook_code(uc_engine *uc, uint64_t address, uint32_t size, void *user_data)
{
    DEBUG_MSG("Hit code at 0x%llx", address);
}
We return to specific hook implementation details later on.
Parsing and validating binaries
In this case we want to fully emulate EFI binaries instead of code snippets, because we have no idea where the target code is located at, so we will have to emulate from entrypoint and trace until we find out.
The target DXE binaries are all PE32+, meaning 64 bit code. This simplifies the loader code since we don’t need to care about 32 bit binaries. Not complicated but the less work, the better.
The PE file format is a bit of a mess (in my humble opinion) because of legacy reasons. Fortunately for us we don’t need to write a fully fledged PE loader. Ange Albertini file format posters are a great reference if you want to visualize and understand the PE format. Besides Microsoft PE format reference, another good reference is Wikibooks.
The code doesn’t implement strong PE validation, meaning no bounds checks. The PE format is complex and presents many opportunities to attack parsers but given the PoC nature of the code I didn’t spend much time caring about this. This is definitely an area for improvement, in particular if you’re focused on analyzing potentially malicious code. It is less complex than writing a parser for Windows PE files because fewer features are used in EFI files (essentially relocations and debug information).
When parsing PE binaries the first thing we want to check is the legacy DOS header to verify if it’s a PE candidate file or not. In this case we only care about binaries with a magic value of IMAGE_DOS_SIGNATURE. For binaries that pass this initial test we want to check the e_lfanew field, which points us to the PE header (DOS header, PE header, optional header… too many headers).
typedef struct _IMAGE_DOS_HEADER {      // DOS .EXE header
    WORD   e_magic;                     // Magic number
    WORD   e_cblp;                      // Bytes on last page of file
    WORD   e_cp;                        // Pages in file
    WORD   e_crlc;                      // Relocations
    WORD   e_cparhdr;                   // Size of header in paragraphs
    WORD   e_minalloc;                  // Minimum extra paragraphs needed
    WORD   e_maxalloc;                  // Maximum extra paragraphs needed
    WORD   e_ss;                        // Initial (relative) SS value
    WORD   e_sp;                        // Initial SP value
    WORD   e_csum;                      // Checksum
    WORD   e_ip;                        // Initial IP value
    WORD   e_cs;                        // Initial (relative) CS value
    WORD   e_lfarlc;                    // File address of relocation table
    WORD   e_ovno;                      // Overlay number
    WORD   e_res[4];                    // Reserved words
    WORD   e_oemid;                     // OEM identifier (for e_oeminfo)
    WORD   e_oeminfo;                   // OEM information; e_oemid specific
    WORD   e_res2[10];                  // Reserved words
    DWORD  e_lfanew;                    // File address of new exe header
} IMAGE_DOS_HEADER, *PIMAGE_DOS_HEADER;
The possible e_magic values are:
#define IMAGE_DOS_SIGNATURE                 0x5A4D      // MZ
#define IMAGE_OS2_SIGNATURE                 0x454E      // NE
#define IMAGE_OS2_SIGNATURE_LE              0x454C      // LE
#define IMAGE_VXD_SIGNATURE                 0x454C      // LE
#define IMAGE_NT_SIGNATURE                  0x00004550  // PE00
#define EFI_IMAGE_TE_SIGNATURE              0x5A56      // VZ
TE binaries with EFI_IMAGE_TE_SIGNATURE magic are just a stripped version of PE. Unnecessary PE headers are removed to save space. The reason is because these binaries are used in SEC and PEI phases, which are resource-restricted so saving space was (still is?) important.
Assuming we are dealing with a modern PE binary, the e_lfanew value should be 0x40. We use this offset to create a pointer to the PE header, which is a IMAGE_NT_HEADERS or IMAGE_NT_HEADERS64 structure, depending on target type.
typedef struct _IMAGE_NT_HEADERS {
    DWORD                 Signature;
    IMAGE_FILE_HEADER     FileHeader;
    IMAGE_OPTIONAL_HEADER OptionalHeader;
} IMAGE_NT_HEADERS, *PIMAGE_NT_HEADERS;

typedef struct _IMAGE_NT_HEADERS64 {
    DWORD Signature;
    IMAGE_FILE_HEADER FileHeader;
    IMAGE_OPTIONAL_HEADER64 OptionalHeader;
} IMAGE_NT_HEADERS64, *PIMAGE_NT_HEADERS64;
We don’t know yet if the binary is 32 or 64 bit. Before that we need to verify if Signature is valid. This time we are looking for a IMAGE_NT_SIGNATURE value. Assuming it is correct we can find if it’s a 64 bit binary using the Machine field from the FileHeader structure. The size of the first two fields of the IMAGE_NT_HEADERS structures are the same so an initial cast to IMAGE_NT_HEADERS isn’t a problem.
typedef struct _IMAGE_FILE_HEADER {
    WORD  Machine;
    WORD  NumberOfSections;
    DWORD TimeDateStamp;
    DWORD PointerToSymbolTable;
    DWORD NumberOfSymbols;
    WORD  SizeOfOptionalHeader;
    WORD  Characteristics;
} IMAGE_FILE_HEADER, *PIMAGE_FILE_HEADER;
The Machine values we care about are IMAGE_FILE_MACHINE_IA64 for 64 bit and IMAGE_FILE_MACHINE_I386 for 32 bit. You can find other CPU values in PE header files.
The last check is against the OptionalHeader structure. The initial fields match between the 32 and 64 bit versions and then diverge.
typedef struct _IMAGE_OPTIONAL_HEADER {
    //
    // Standard fields.
    //
    WORD                 Magic;
    BYTE                 MajorLinkerVersion;
    BYTE                 MinorLinkerVersion;
    DWORD                SizeOfCode;
    DWORD                SizeOfInitializedData;
    DWORD                SizeOfUninitializedData;
    DWORD                AddressOfEntryPoint;
    DWORD                BaseOfCode;
(...)
We want to verify if Magic is one of these values:
#define IMAGE_NT_OPTIONAL_HDR32_MAGIC      0x10b
#define IMAGE_NT_OPTIONAL_HDR64_MAGIC      0x20b
Successfully arriving at this point means we have a valid PE target (assuming the code did all necessary bounds checks) and we can take a look at the total available sections, NumberOfSections in IMAGE_FILE_HEADER structure. Sections contain code and different kinds data (strings, relocation and debugging information, etc).
This is an example of the sections available in the main EFI binary being emulated (one section is nameless):
[DEBUG] Target PE file contains 6 sections.
[DEBUG] Number of sections is 6.
[DEBUG] Name .text @ 0x100002c0 VirtualSize: 0x51a0 RawSize: 0x51a0
[DEBUG] Name .rdata @ 0x10005460 VirtualSize: 0xc54 RawSize: 0xc60
[DEBUG] Name .data @ 0x100060c0 VirtualSize: 0x12a8 RawSize: 0x12c0
[DEBUG] Name  @ 0x10007380 VirtualSize: 0x36c RawSize: 0x380
[DEBUG] Name text @ 0x10007700 VirtualSize: 0xa2 RawSize: 0xc0
[DEBUG] Name .reloc @ 0x100077c0 VirtualSize: 0x6e RawSize: 0x80
Each section needs to be mapped into Unicorn emulator memory. We could select only the really necessary sections but it’s just easier to just map everything (RAM is plentiful these days). Sections are located after the headers.
This makes up the initial validation. Any rejection here means we can’t emulate the binary.
Mapping the PEs
Mapping the binary sections into Unicorn memory is a simple exercise. We just need to use uc_mem_write Unicorn API.
/*
 Write to a range of bytes in memory.

 @uc: handle returned by uc_open()
 @address: starting memory address of bytes to set.
 @bytes:   pointer to a variable containing data to be written to memory.
 @size:   size of memory to write to.

 NOTE: @bytes must be big enough to contain @size bytes.

 @return UC_ERR_OK on success, or other value on failure (refer to uc_err enum
   for detailed error).
*/
UNICORN_EXPORT
uc_err uc_mem_write(uc_engine *uc, uint64_t address, const void *bytes, size_t size);
The main issue is the address where to write the binary. Most Apple DXE binaries have a 0x10000000 preferred address. I found at least two exceptions but this isn’t an important enough problem to justify gathering data about it and worrying. These binaries contain Position Independent Code (PIC) so we can easily relocate them to any address (and it’s less work because they are 64 bit).
For the main binary we use that preferred address and map each section using its VirtualAddress from IMAGE_SECTION_HEADER structure.
typedef struct _IMAGE_SECTION_HEADER {
    BYTE    Name[IMAGE_SIZEOF_SHORT_NAME];
    DWORD   VirtualSize;
    DWORD   VirtualAddress;
    DWORD   SizeOfRawData;
    DWORD   PointerToRawData;
    DWORD   PointerToRelocations;
    DWORD   PointerToLinenumbers;
    WORD    NumberOfRelocations;
    WORD    NumberOfLinenumbers;
    DWORD   Characteristics;
} IMAGE_SECTION_HEADER, *PIMAGE_SECTION_HEADER;
Regarding the size to write we should use min(SizeOfRawData, VirtualSize). The values can be different because of file alignment issues such that VirtualSize <= SizeOfRawData. Using SizeOfRawData can lead to out-of-bounds reads.
Other executables are mapped sequentially after the main one. All the binary’s information is stored in a tail queue so we always know where last binary was mapped.
Trampolines? What for?
We start Unicorn code emulation using this API function:
/*
 Emulate machine code in a specific duration of time.

 @uc: handle returned by uc_open()
 @begin: address where emulation starts
 @until: address where emulation stops (i.e when this address is hit)
 @timeout: duration to emulate the code (in microseconds). When this value is 0,
        we will emulate the code in infinite time, until the code is finished.
 @count: the number of instructions to be emulated. When this value is 0,
        we will emulate all the code available, until the code is finished.

 @return UC_ERR_OK on success, or other value on failure (refer to uc_err enum
   for detailed error).
*/
UNICORN_EXPORT
uc_err uc_emu_start(uc_engine *uc, uint64_t begin, uint64_t until, uint64_t timeout, size_t count);
We need to specify the address where emulation starts and where it ends. Zero can be used for the end address. What happens is that Unicorn will continue to emulate until something breaks (assuming zero for timeout and count arguments).
If we are emulating a single image this isn’t a big problem - we can either manually set an end address or just let it run until it crashes inside the emulator. But we need to emulate other images before the main image. Their entrypoint is easy to locate from the headers but we don’t know the end address of their main function (unless we hardcode it). We could disassemble the entrypoint function and try to find where it ends but this isn’t always straightforward and it’s too much work.
There is an easier way to solve this. We can just use a trampoline shellcode to start each image and we easily have a known emulation end address.
This is the shellcode I used for the trampoline:
    uint8_t shellcode[13] =
    "\x48\xB8\x00\x00\x00\x00\x00\x00\x00\x00"  // mov rax, 0x0
    "\xFF\xD0"                                  // call rax
    "\xCC";                                     // INT3 - don't exec
We call the entrypoint address and we know that emulation should stop at the call return address, so it’s very easy to calculate everything. We guard the shellcode with an INT3 in case of something goes wrong (easier to detect and debug).
This is an example output from execution of a secondary image responsible for installing a protocol (I’ll explain protocols soon). The image was executed without any problems, emulation stopped at the trampoline return address, and then emulation started at the main image entrypoint.
[+] Configuring Unicorn initial state...
[+] Starting secondary images emulation...
[DEBUG] Hit InstallProtocolInterface() from 0x50000019
Requested Protocol: DF2D868E-32FC-4CF0-8E6B-FFD95D1343D0
[DEBUG] Interface address 0x100093d0
Installed Protocol: DF2D868E-32FC-4CF0-8E6B-FFD95D1343D0
[+] Starting main image emulation...
Trampolines are helpful and super-easy to implement since we just write them sequentially and store information about which image they correspond to.
Relocations!
The last thing we need to care about mapping from the PE files is relocations. Given that we are dealing with 64 bit binaries the amount of relocations will be zero or very small, depending on the target. In practice we only care about relocations for the secondary images, the ones we map at different addresses from their preferred locations. The main image is mapped at the preferred address 0x10000000 (we assume that our main image preferred address is always this one). Any main image exceptions we can deal with by either mapping at their preferred address (don’t forget to map emulator memory first) or at 0x10000000 and fix up its relocations.
Relocations are easier to understand with an example. The following is the entrypoint function for a secondary image that I map in the emulator. At address 0x100002AF there is a data reference to another address 0x100013D0.

At address 0x100013D0 we can find a pointer to another address 0x100002FC, which is another function in this image.

The pointer will be valid if this image is mapped at its 0x10000000 preferred address. But because it’s a secondary image and the emulator mapped it at 0x10008000, the pointer is now invalid because address 0x100002FC belongs to the main image or nowhere (depending on the size of main image). We are 0x8000 bytes off the original address. This means that the original 0x100002fc value needs to be updated by adding 0x8000 bytes to a new value of 0x100082fc.
The relocation table tells us where all the values that need to be updated are located. We just need to find the table, iterate, and fix values by whatever offset we moved the image.
This log from the emulator shows all this being done.
[+] Loading and mapping any configured protocols binaries
[DEBUG] Mapping other image to 0x10008000
[DEBUG] Size of image: 0x14a0
[DEBUG] Size of headers: 0x2a0
[DEBUG] Base address: 0x10000000
[DEBUG] Entry point address: 0x100002a0
[DEBUG] Relocation table virtual address: 0x1480 size: 12
[DEBUG] Relocation info: 0x1000 0xc

[DEBUG] Total relocation entries: 2
[DEBUG] Reloc type 0xa Base 0x3d0
[DEBUG] mapped relocation addr: 0x100093d0
[DEBUG] original relocation addr: 0x100013d0
[DEBUG] relocation original value: 0x100002fc
[DEBUG] updated relocation value: 0x100082fc

[DEBUG] Reloc type 0xa Base 0x3d8
[DEBUG] mapped relocation addr: 0x100093d8
[DEBUG] original relocation addr: 0x100013d8
[DEBUG] relocation original value: 0x1000063c
[DEBUG] updated relocation value: 0x1000863c
There are different relocation types. The code only deals with EFI_IMAGE_REL_BASED_DIR64 type, which seems the only one relevant for EFI DXE binaries.
// Based relocation types.
//
#define EFI_IMAGE_REL_BASED_ABSOLUTE        0
#define EFI_IMAGE_REL_BASED_HIGH            1
#define EFI_IMAGE_REL_BASED_LOW             2
#define EFI_IMAGE_REL_BASED_HIGHLOW         3
#define EFI_IMAGE_REL_BASED_HIGHADJ         4
#define EFI_IMAGE_REL_BASED_MIPS_JMPADDR    5
#define EFI_IMAGE_REL_BASED_ARM_MOV32A      5
#define EFI_IMAGE_REL_BASED_ARM_MOV32T      7
#define EFI_IMAGE_REL_BASED_IA64_IMM64      9
#define EFI_IMAGE_REL_BASED_MIPS_JMPADDR16  9
#define EFI_IMAGE_REL_BASED_DIR64           10
The relocation table can be found in IMAGE_DIRECTORY_ENTRY_BASERELOC entry of DataDirectory table in OptionalHeader structure.
#define IMAGE_NUMBEROF_DIRECTORY_ENTRIES    16

typedef struct _IMAGE_OPTIONAL_HEADER64 {
    WORD        Magic;
    (...)
    IMAGE_DATA_DIRECTORY DataDirectory[IMAGE_NUMBEROF_DIRECTORY_ENTRIES];
} IMAGE_OPTIONAL_HEADER64, *PIMAGE_OPTIONAL_HEADER64;

// Directory Entries

#define IMAGE_DIRECTORY_ENTRY_EXPORT          0   // Export Directory
#define IMAGE_DIRECTORY_ENTRY_IMPORT          1   // Import Directory
#define IMAGE_DIRECTORY_ENTRY_RESOURCE        2   // Resource Directory
#define IMAGE_DIRECTORY_ENTRY_EXCEPTION       3   // Exception Directory
#define IMAGE_DIRECTORY_ENTRY_SECURITY        4   // Security Directory
#define IMAGE_DIRECTORY_ENTRY_BASERELOC       5   // Base Relocation Table
#define IMAGE_DIRECTORY_ENTRY_DEBUG           6   // Debug Directory
//      IMAGE_DIRECTORY_ENTRY_COPYRIGHT       7   // (X86 usage)
#define IMAGE_DIRECTORY_ENTRY_ARCHITECTURE    7   // Architecture Specific Data
#define IMAGE_DIRECTORY_ENTRY_GLOBALPTR       8   // RVA of GP
#define IMAGE_DIRECTORY_ENTRY_TLS             9   // TLS Directory
#define IMAGE_DIRECTORY_ENTRY_LOAD_CONFIG    10   // Load Configuration Directory
#define IMAGE_DIRECTORY_ENTRY_BOUND_IMPORT   11   // Bound Import Directory in headers
#define IMAGE_DIRECTORY_ENTRY_IAT            12   // Import Address Table
#define IMAGE_DIRECTORY_ENTRY_DELAY_IMPORT   13   // Delay Load Import Descriptors
#define IMAGE_DIRECTORY_ENTRY_COM_DESCRIPTOR 14   // COM Runtime descriptor
The referenced Microsoft documentation has all the necessary implementation details that I don’t think are important to explain here.
The base relocation table is divided into blocks. Each block represents the base relocations for a 4K page. Each block must start on a 32-bit boundary.
We finally have all the necessary pieces to map and run an EFI executable in Unicorn emulator.
It’s the protocols, stupid!
The concept of libraries and a libc does not exist in EFI world. Instead there are basic services, which are different according to the boot phase (PPIs for PEI phase, protocols for DXE). We will develop the basic services topic in the EFI tables section because we will need to create and emulate (some of) these services.
Any additional features in DXE phase are implemented via protocols. Protocols are published by other EFI executables. Then they can be located and used by other binaries. It is the same abstract concept of linked libraries but implemented in a slightly different way. This is the reason why we need to map other images before running the main image. In reality EFI has a dispatcher that guarantees all dependencies and load order, but to avoid reimplementing that feature we just load all the binaries that contain the protocols used by our main target binary ourselves (this requires previous reverse engineering or trial and error to determine which protocols are missing).
Each protocol is identified by a GUID (in EFI everything is identified by a GUID) and contains function pointers to whatever features are provided by the protocol.
In this particular case our target uses protocol DF2D868E-32FC-4CF0-8E6B-FFD95D1343D0, which corresponds to EFI_PRINT_PROTOCOL containing a function to print unicode strings. Translation of some GUIDs to human-readable strings can be found online and within EDK2 sources, while others are private and need to be reversed to understand what they correspond to.
#define EFI_PRINT_PROTOCOL_GUID  \
   { 0xdf2d868e, 0x32fc, 0x4cf0, {0x8e, 0x6b, 0xff, 0xd9, 0x5d, 0x13, 0x43, 0xd0} }

typedef struct _EFI_PRINT_PROTOCOL  EFI_PRINT_PROTOCOL;

typedef
UINTN
(EFIAPI *UNI_VSPRINT)(
  OUT CHAR16        *StartOfBuffer,
  IN  UINTN         BufferSize,
  IN  CONST CHAR16  *FormatString,
  IN  VA_LIST       Marker
  );

/**
   EFI_PRINT_PROTOCOL provides one service to produce a Null-terminated Unicode string,
   based on a Null-terminated Unicode format string and a VA_LIST argument list, and fills into
   the buffer as output.
**/
struct _EFI_PRINT_PROTOCOL {
  UNI_VSPRINT               VSPrint;
};
We could try to hook and emulate any calls to this VSPrint function (which I did first) but I found it easier and more portable to just load the protocol binaries, avoiding reimplementation of potentially complicated functions (well most we could try to rip from EDK2 source code anyway). This might require extra work for protocols that interact with hardware and so on, but not impossible - we can hook things and fake whatever we need.
EFI system tables and services
As previously mentioned, there is a basic set of services provided by the EFI runtime. In the DXE phase they are divided between the Boot and Runtime services. Runtime services are the only EFI services available after system boot and they are very restricted, as we can see from its table.
typedef struct {
    EFI_TABLE_HEADER Hdr;
    EFI_GET_TIME GetTime;
    EFI_SET_TIME SetTime;
    EFI_GET_WAKEUP_TIME GetWakeupTime;
    EFI_SET_WAKEUP_TIME SetWakeupTime;
    EFI_SET_VIRTUAL_ADDRESS_MAP SetVirtualAddressMap;
    EFI_CONVERT_POINTER ConvertPointer;
    EFI_GET_VARIABLE GetVariable;
    EFI_GET_NEXT_VARIABLE_NAME GetNextVariableName;
    EFI_SET_VARIABLE SetVariable;
    EFI_GET_NEXT_HIGH_MONO_COUNT GetNextHighMonotonicCount;
    EFI_RESET_SYSTEM ResetSystem;
    EFI_UPDATE_CAPSULE UpdateCapsule;
    EFI_QUERY_CAPSULE_CAPABILITIES QueryCapsuleCapabilities;
    EFI_QUERY_VARIABLE_INFO QueryVariableInfo;
} EFI_RUNTIME_SERVICES;
Boot services are a bit more interesting because they are available in the DXE phase and are mostly related to memory and protocol management, essential to set up a running operating environment and provide more features as we have seen in protocols.
typedef struct {
    EFI_TABLE_HEADER Hdr;
    EFI_RAISE_TPL RaiseTPL;
    EFI_RESTORE_TPL RestoreTPL;
    EFI_ALLOCATE_PAGES AllocatePages;
    EFI_FREE_PAGES FreePages;
    EFI_GET_MEMORY_MAP GetMemoryMap;
    EFI_ALLOCATE_POOL AllocatePool;
    EFI_FREE_POOL FreePool;
    EFI_CREATE_EVENT CreateEvent;
    EFI_SET_TIMER SetTimer;
    EFI_WAIT_FOR_EVENT WaitForEvent;
    EFI_SIGNAL_EVENT SignalEvent;
    EFI_CLOSE_EVENT CloseEvent;
    EFI_CHECK_EVENT CheckEvent;
    EFI_INSTALL_PROTOCOL_INTERFACE InstallProtocolInterface;
    EFI_REINSTALL_PROTOCOL_INTERFACE ReinstallProtocolInterface;
    EFI_UNINSTALL_PROTOCOL_INTERFACE UninstallProtocolInterface;
    EFI_HANDLE_PROTOCOL HandleProtocol;
    void *Reserved;
    EFI_REGISTER_PROTOCOL_NOTIFY RegisterProtocolNotify;
    EFI_LOCATE_HANDLE LocateHandle;
    EFI_LOCATE_DEVICE_PATH LocateDevicePath;
    EFI_INSTALL_CONFIGURATION_TABLE InstallConfigurationTable;
    EFI_IMAGE_LOAD LoadImage;
    EFI_IMAGE_START StartImage;
    EFI_EXIT Exit;
    EFI_IMAGE_UNLOAD UnloadImage;
    EFI_EXIT_BOOT_SERVICES ExitBootServices;
    EFI_GET_NEXT_MONOTONIC_COUNT GetNextMonotonicCount;
    EFI_STALL Stall;
    EFI_SET_WATCHDOG_TIMER SetWatchdogTimer;
    EFI_CONNECT_CONTROLLER ConnectController;
    EFI_DISCONNECT_CONTROLLER DisconnectController;
    EFI_OPEN_PROTOCOL OpenProtocol;
    EFI_CLOSE_PROTOCOL CloseProtocol;
    EFI_OPEN_PROTOCOL_INFORMATION OpenProtocolInformation;
    EFI_PROTOCOLS_PER_HANDLE ProtocolsPerHandle;
    EFI_LOCATE_HANDLE_BUFFER LocateHandleBuffer;
    EFI_LOCATE_PROTOCOL LocateProtocol;
    EFI_INSTALL_MULTIPLE_PROTOCOL_INTERFACES InstallMultipleProtocolInterfaces;
    EFI_UNINSTALL_MULTIPLE_PROTOCOL_INTERFACES UninstallMultipleProtocolInterfaces;
    EFI_CALCULATE_CRC32 CalculateCrc32;
    EFI_COPY_MEM CopyMem;
    EFI_SET_MEM SetMem;
    EFI_CREATE_EVENT_EX CreateEventEx;
} EFI_BOOT_SERVICES;
The DXE executables can find the location of these Runtime and Boot structures via EFI_SYSTEM_TABLE, which is the second argument passed to the entrypoint function of DXE binaries.
This is the DXE binary’s entrypoint prototype:
typedef
EFI_STATUS
( *EFI_IMAGE_ENTRY_POINT)(
                          EFI_HANDLE ImageHandle,
                          EFI_SYSTEM_TABLE *SystemTable
                          );
And the EFI_SYSTEM_TABLE structure, where it’s easy to obtain the Runtime and Boot services tables pointers.
typedef struct {
    EFI_TABLE_HEADER Hdr;
    CHAR16 *FirmwareVendor;
    UINT32 FirmwareRevision;
    EFI_HANDLE ConsoleInHandle;
    EFI_SIMPLE_TEXT_INPUT_PROTOCOL *ConIn;
    EFI_HANDLE ConsoleOutHandle;
    EFI_SIMPLE_TEXT_OUTPUT_PROTOCOL *ConOut;
    EFI_HANDLE StandardErrorHandle;
    EFI_SIMPLE_TEXT_OUTPUT_PROTOCOL *StdErr;
    EFI_RUNTIME_SERVICES *RuntimeServices;
    EFI_BOOT_SERVICES *BootServices;
    UINTN NumberOfTableEntries;
    EFI_CONFIGURATION_TABLE *ConfigurationTable;
} EFI_SYSTEM_TABLE;
It is quite common to see code like this in DXE phase binaries (or some variation at the entrypoint when no function is called):

We need to implement Boot and Runtime services inside the emulator. We map a fake EFI_SYSTEM_TABLE into emulator memory, and set the RDX register pointing to our fake table (EFI 64 bit binaries use Microsoft x64 calling convention - RCX, RDX, R8, R9, stack, with a 32 byte shadow space in stack, so that first stack argument is at offset 0x20).
We also map into emulator memory fake Boot and Runtime services tables. Each service is a function pointer. This leads us to the next problem we face: we could map a copy of real services code into emulator memory. This could be complex because it expects a full EFI environment and so we might end up in a (hellish) cycle of implementing other dependencies.
Another solution for this problem is to emulate the services in our code, outside the emulator. In this case, the services function pointers point to a single RET x86 instruction. This way, calls to the services will return and we don’t need to worry about manipulating service callers. We take control of each service by configuring a Unicorn hook per service address. When a service is called, Unicorn will callback the configured hook. In the callback we emulate the original service, set return values if necessary, and resume Unicorn execution at the simple RET instruction.
When the Unicorn hook is hit, the emulator instruction pointer points at the service’s first instruction. Using Unicorn API we can read the arguments passed to the service, and manipulate Unicorn memory to implement the original service.
Let’s see a sample implementation of a Boot service.
/*
 * EFI_STATUS(EFIAPI * EFI_STALL) (IN UINTN Microseconds)
 */
static void
hook_Stall(uc_engine *uc, uint64_t address, uint32_t size, void *user_data)
{
    uc_err err = UC_ERR_OK;

    LOG_UC_BACKTRACE(uc, "Stall()");

    uint64_t r_rcx = 0;     /* Microseconds */
    err = uc_reg_read(uc, UC_X86_REG_RCX, &r_rcx);
    VERIFY_UC_OPERATION_VOID(err, "Failed to read RCX register");
    uint32_t Microseconds = (uint32_t) r_rcx;

    usleep(Microseconds);

    /* return value */
    uint64_t r_rax = EFI_SUCCESS;
    err = uc_reg_write(uc, UC_X86_REG_RAX, &r_rax);
    VERIFY_UC_OPERATION_VOID(err, "Failed to write RAX return value");
}
The Stall Boot service is basically a usleep and it’s very easy to implement. Don’t forget that the callback is running in our code context and not emulator context. We can read the Microseconds argument passed to this service, emulate the stall on our side with usleep, set the required return value per service prototype and resume execution.
A bit more complex example is the SetMem service implementation:
/*
 * VOID(EFIAPI * EFI_SET_MEM) (IN VOID *Buffer, IN UINTN Size, IN UINT8 Value)
 */
static void
hook_SetMem(uc_engine *uc, uint64_t address, uint32_t size, void *user_data)
{
    uc_err err = UC_ERR_OK;

    LOG_UC_BACKTRACE(uc, "SetMem()");

    uint64_t r_rcx = 0;     /* *Buffer */
    uint64_t r_rdx = 0;     /* Size */
    uint64_t r_r8 = 0;      /* Value */

    /* variables to hold parameters and make it easier to identify what is what */
    uint64_t Buffer = 0;
    uint32_t Size = 0;
    uint8_t Value = 0;

    /* Read Buffer parameter */
    err = uc_reg_read(uc, UC_X86_REG_RCX, &r_rcx);
    VERIFY_UC_OPERATION_VOID(err, "Failed to read RCX register");
    Buffer = r_rcx;
    DEBUG_MSG("SetMem Buffer address: 0x%llx", r_rcx);

    /* Read Size parameter */
    err = uc_reg_read(uc, UC_X86_REG_RDX, &r_rdx);
    VERIFY_UC_OPERATION_VOID(err, "Failed to read RDX register");
    Size = (uint32_t)r_rdx;
    if (Size == 0)
    {
        DEBUG_MSG("Request size to SetMem is zero bytes.");
        /* no return value */
        return;
    }

    DEBUG_MSG("Requested size to SetMem: 0x%x", (uint32_t)r_rdx);

    /* read Value parameter */
    err = uc_reg_read(uc, UC_X86_REG_R8, &r_r8);
    VERIFY_UC_OPERATION_VOID(err, "Failed to read R8 register");
    Value = (uint8_t)r_r8;

    /* finally write whatever value requests into Unicorn memory buffer */
    /* XXX: not exactly the most efficient way :-) */
    for (uint32_t i = 0; i < Size; i++)
    {
        err = uc_mem_write(uc, r_rcx + i, &Value, 1);
        VERIFY_UC_OPERATION_NORET(err, "Failed to write memory");
    }

    /* no return value */
}
Here I just read the arguments, and then set the requested memory address inside the emulator to whatever value was requested (in a very inefficient way).
This is a crude way to emulate the Boot and Runtime services but it works and it’s fast to implement. Less development work, happy hacker!
For the heap allocator I didn’t even bother to try to write a basic allocator. I simply allocate memory forward in the heap area, and don’t even bother with free’ing the allocated blocks when required. Given the short-term duration of emulation, why bother? Just increase emulation heap area if necessary and save unnecessary development time. Choose the problems you have to solve wisely!
In the sample code I implemented the minimum required services by my target binary. Other targets might require additional services so they would need to be implemented in the same way.
NVRAM
The target binary reads data from the NVRAM so it is necessary to emulate it. The NVRAM variables are accessed via a Runtime service. In this case I have mapped a copy of a NVRAM dump from a real Mac’s EFI, and my GetVariable Runtime service hook will basically look up the variable in the file and return the data if it exists.
The only problem to solve is the type of NVRAM stores and variable, because there are different formats.
#define NVRAM_VSS_STORE_SIGNATURE            0x53535624 // $VSS
#define NVRAM_APPLE_SVS_STORE_SIGNATURE      0x53565324 // $SVS
#define NVRAM_APPLE_FSYS_STORE_SIGNATURE     0x73797346 // Fsys
#define NVRAM_APPLE_GAID_STORE_SIGNATURE     0x64696147 // Gaid
The first DWORD points to the signature, from which we can identify the type of store and then parse it. The sample code implements parsing of NVRAM_VSS_STORE_SIGNATUREand NVRAM_APPLE_SVS_STORE_SIGNATURE stores, which can be parsed by the same code. UEFITool (use the new_engine branch) is a good codebase if you want to learn how to parse all kinds of NVRAM variables (and everything else about (U)EFI parsing).
How to implement breakpoints
The goal is to build an interactive debugger so breakpoints are a must-have feature. In a real x86 CPU we have four hardware breakpoints and software breakpoints (usually) implemented via an INT3 instruction.
Hardware breakpoints are great because we configure the breakpoint address and the CPU will stop execution before the instruction is executed. Hardware breakpoints don’t modify the code so they will not trigger any potential code integrity checks, and we don’t need to manage and fix up the code to properly support software breakpoints. Malicious and DRM related software usually tries to block hardware breakpoints by checking if the debug registers are being used or implementing some feature on top of those registers - if they are clean or used then errors will occur.
Software breakpoints are implemented by replacing the instruction at the target address with an INT3 instruction. When the instruction is executed, it will generate an exception which can be captured by a debugger. The main problem is that we need to patch code so code integrity checks can be triggered. When the breakpoint is hit we need to restore the original code, rollback the instruction pointer to the original address, find our next instruction, set a breakpoint on it, resume execution, and when the next instruction breakpoint is hit we restore the first breakpoint, assuming it was a (permanent) breakpoint that we still want enabled. Lots of work :-).
The initial idea was to implement software breakpoints. The typical debugger approach requires some work to manage the breakpoints and it conflicts with the QEMU JIT engine (if we modify the code after emulation is started, the modification is present in memory but the virtual CPU will not execute our modified code but instead the cached version that was already JIT-compiled).
It is also not possible in Unicorn to add new hooks while emulation is running. In this case the idea would be to add a hook as breakpoint. It works if we add the hook before emulation starts, but then we don’t have an interactive debugger. A workaround could be to stop emulation, set a new hook, and resume emulation. This is too complex when a simpler solution exists.
My solution was to add a hook that traces all the code and implement the breakpoint decision inside. The command to add breakpoints just adds the target address to a list, and this list is searched everytime an instruction is executed. Not exactly the fastest solution (tail queue traversal) but it works and emulation speed isn’t a huge problem in this case. At least it’s a very useful trade-off, slower emulation speed vs interactive debugging.
The code for my main Unicorn hook is the following:
/*
 * main hook we used to trace over code
 *
 * we fake breakpoints here by comparing the current address against installed breakpoints
 * and if it matches we launch the cli prompt
 *
 */
void
hook_code(uc_engine *uc, uint64_t address, uint32_t size, void *user_data)
{
    /* XXX: a temporary hack to inject directly the Apple public key into the right location
     * avoiding to emulate the whole protocol that locates the keys in the EFI filesystem
     */
    if (address == 0x10002272)
    {
        DEBUG_MSG("Hit Apple public key injection breakpoint!");
        uint64_t r_rdx = 0;
        uc_err err = UC_ERR_OK;
        err = uc_reg_read(uc, UC_X86_REG_RDX, &r_rdx);
        VERIFY_UC_OPERATION_VOID(err, "Failed to read RDX");
        DEBUG_MSG("RDX is 0x%llx", r_rdx);
        err = uc_mem_write(uc, r_rdx, apple_public_key, sizeof(apple_public_key));
        VERIFY_UC_OPERATION_VOID(err, "Failed to write Apple public key to Unicorn memory");
        return;
    }
    int type = 0;
    if (find_breakpoint(address, &type) == 0)
    {
        /* display current CPU context like gdbinit */
        context_cmd(NULL, uc);
        /* and let the user take control */
        prompt_loop();
        /* if it's a temporary breakpoint remove it from the list */
        if (type == kTempBreakpoint)
        {
            del_breakpoint(address);
        }
    }
}
Everytime a breakpoint is matched, a gdbinit-like CPU context is displayed, and the interactive prompt is enabled, allowing us to poke around and even modify memory and registers. The only problem is that we can’t modify instructions (but we can modify the instruction pointer), and also EFLAGS/RFLAGS register (QEMU internal flags aren’t updated, I guess due to JIT). Not the perfect scenario, but still a huge step forward given the ability to breakpoint and debug code that we had no capability to previously.
Apple’s public key problem
The previous hook code snippet contains an hardcoded breakpoint address related to the Apple public keys for signature verification. What happens is that Apple RSA public keys are located in a EFI file that contains 4 raw sections. The protocol that searches and loads these keys uses the AC5E4829-A8FD-440B-AF33-9FFE013B12D8 GUID, installed by EFI module with GUID 8B24E4D4-C84C-4FFC-81E5-D3EACC3F08DD. The GUID for the file with the keys is B2CB10B1-714A-4E0C-9ED3-35688B2C99F0. You should be able to find all these by loading an Apple firmware file into UEFITool. To avoid implementing the protocol and any dependencies it might have, I set a breakpoint at the protocol call address, copy the public key directly to the allocated buffer, set a success return value, and advance the instruction pointer to skip the call.

While it would be nice to have everything emulated and running it is not necessary and can be a waste of time when simple tricks solve the problems faster.
Serial number
The target machine serial number is required for the SCBO operation. On real machines the serial number can be found in a fixed memory area at address 0xffffff08. Because of Unicorn memory alignment requirements, the allocation address starts at 0xffff0000. The memory layout of the serial number seems to always end with “\x20\xFF” bytes, probably some end marker bytes. Other EFI binaries might require access to other machine information that is located in this area. If that’s the case we just need to find it out and emulate.
Nikolaj from UEFITool told me this isn’t true anymore in newer firmware versions (thanks for the headsup!). This data is now stored in the PDR region. I have to give it a look in newer versions but it shouldn’t be a major obstacle given that we can always breakpoint on code that is trying to read the serial number and fix it like the public key case.
The cli
The command line interface is based on linenoise-ng. It tries to emulate some basic gdb commands (because I hate LLDB cli). It’s quite a hack and fragile since it’s the type of code I suck at and I just wanted something that worked. Definitely needs some love and improvements.
The end
And that’s it. The main problems and workarounds were described and the result is a working EFI DXE emulator and interactive debugger. As you can see it’s not very complicated to create. It just requires some understanding of the emulation target specifics and some creativity to solve some of the problems. The idea can be extended to other Unicorn-supported CPU targets. For example, baseband firmware, Apple’s SEP OS, kernel extensions, and so on. Fuzzing is also something that could be implemented to find nice bugs. The emulation approach was used to fuzz TrustZone binaries in the following paper released this week, PARTEMU: Enabling Dynamic Analysis of Real-World TrustZone Software Using Emulation. The paper’s authors used the same kind of approach to fuzz TrustZone binaries. QEMU is used instead of Unicorn but you can see they used the same type of ideas I just described. Emulate the minimum necessary to get things going instead of wasting time in full implementation.
I forgot to mention in the original post, but Saumil Shah new ARM-X Firmware Emulation Framework also looks like a very interesting project if you are interested in IoT devices emulation. I had no time yet to try it but Saumil has been into ARM hacking for quite a while.
The code can be found here. It’s BSD licensed so feel free to do whatever you want. Just give some credits back if you do something useful :-).
I quit Apple almost a month ago so this blog might become more active again. Have to waste creativity and funemployment time somewhere!
A big thanks to Jeffrey Czerniak (@geekable) for pre-publication editing (contact him if you need technical review work) and Francisco Alonso (@revskills) for initial draft read.
Have fun,
fG!