For quite some time I have wanted to build a site where I could share links to the stuff I read online. There must be already plenty of sites to solve this but none satisfies my main requisite: to be under my full control. I rather do all the work myself than giving up control to a third-party that can lock me down for any reason (Twitter for example). It’s a price that I am willing to pay.
One of the main obstacles to build the site was that I needed to add/edit information from my desktop and tablet. I am definitely not a cloud fan so using it to sync between devices was out of question (people do it with Evernote, etc). For a while I thought about developing a mobile or web application to achieve this but was too lazy for that.
Last weekend the right idea popped in my mind (I think I was reading something about the topic). I could use GitHub to store the data that I need to edit between devices, and GitHub actions to automate the build process. GitHub allows unlimited private repositories to free users, and the data to store there isn’t critical. I would always have a local copy and if GitHub bans me the impact is meaningless - they are just an intermediary and both ends are controlled by me.
Hugo is a really nice static site generator and I already use a similar site with Papers. The difference is that I manage Papers only from my desktop because extra work necessary. It has a few of automated steps (generate hashes, changelog, etc) but still requires some manual work (copy-paste paper titles and authors, which is not always possible to extract).
My initial idea was to have a daily post file, which I could edit in any of the devices and then push to GitHub. This could be done via the browser since GitHub allows you to edit files. I thought to use a GitHub Actions workflow to automate the creation of the daily file that I just needed to edit when necessary. First time Action’s user but it is straightforward to create a scheduled workflow that creates the daily file.
The next problem was how to use Hugo in a workflow to build and deploy the site. After reading some blog posts, I learnt that most people create a workflow to generate the Hugo site and deploy it to GitHub Pages.
But I want the site to be under my control so this clearly wasn’t the solution I wanted. Some people deploy the pages to a server or cloud services (AWS, Azure, etc). This creates a problem of storing access credentials in GitHub and more important, inbound access from third-parties to my server. GitHub just disclosed that they had a backend problem mixing up authentication sessions. Instead of a push model I want a pull model from my server.
Reading a couple more blog posts and I finally established my setup.
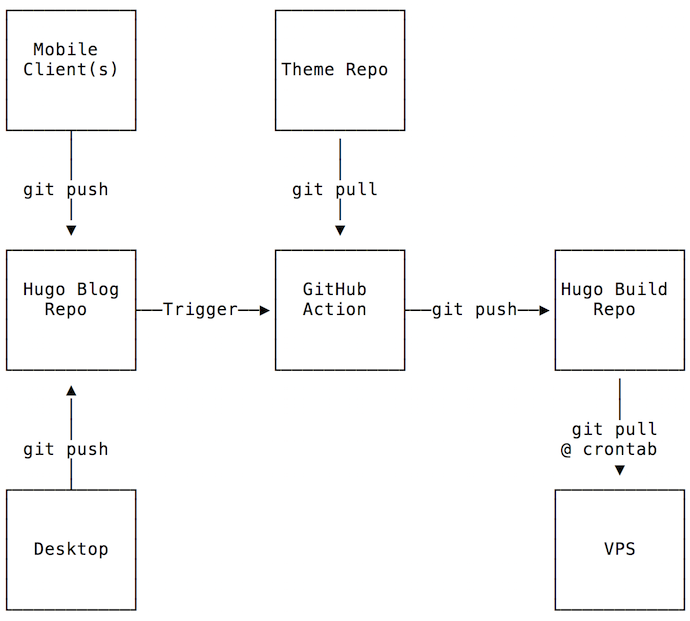
I use three separate private repositories (repos), one for the Hugo source site, one for the Hugo build, and one for the theme. The most used solution with GitHub Pages is to have two branches, one to create and edit the posts, and another where to publish the pages. GitHub Pages works by writing data to a specific folder. I think this setup is a bit weird and confusing. When Hugo builds the static pages the (default) output goes to public folder. This data would have to be committed to a different branch, which would be pulled by the server. I am not a git power user and this setup looks confusing so I kept searching for a better solution.
Another blogpost described using two repositories, one for holding the Hugo blog, and another with the build output. In this case, the GitHub Action would generate the static pages and then copy and commit to the build repository. Better but still not “perfect”.
Then I read how someone used git submodules feature to solve this. In this setup the build repo is configured as a submodule of the Hugo repo in the public folder. Hugo generates the static pages into the public folder, and then we just need to commit the changes in the submodule and let git do the dirty work to update the build repo. Simple and beautiful solution! The same configuration is used for the forked theme. I didn’t want to mix commit history, even if the customizations only make it useful for the specific site.
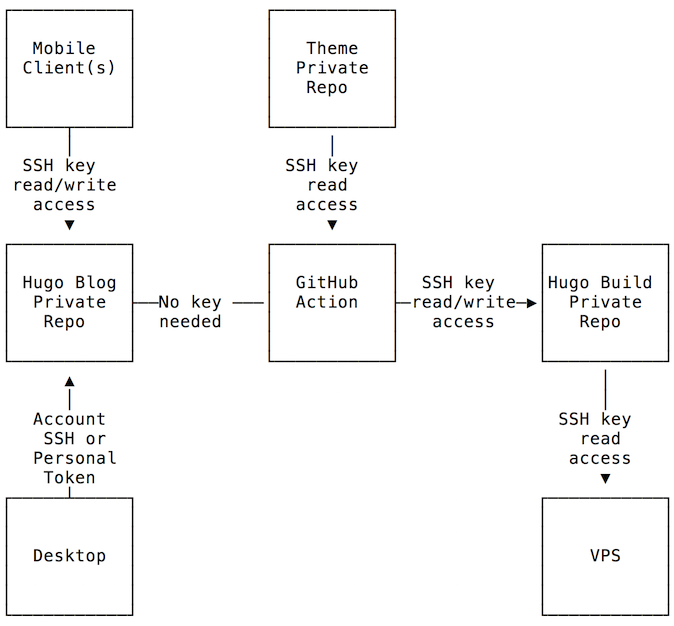
Authentication will be necessary since all the repos are private. Github supports personal access tokens and SSH deploy keys. Personal access tokens don’t have per repository granular control. You can configure scopes but they are applied to every repository under your user, meaning, you can’t restrict a token to a specific repository. Not the right tool for the task at hand.
The deploy keys are more interesting. They are configured per repository and can have read-only or read/write access to a repository. Keys also remove the need to have GitHub passwords in the mobile device (using an app instead of website). Assuming no GitHub snafus managing keys, there is isolation between the components without compromising other repositories. Further isolation could be achieved by using a new account just for this setup. In case of compromise the damage is very limited.
There is an issue when using multiple keys in a single repository but the solution is easy as shown later on.
This is the deploy keys setup and permissions:
Let’s see how to set up all this. These initial “bootstrap” steps are executed in the desktop and GitHub website.
The first step is to create three private repositories, links, linksbuild, spectre-pixel. If you change the repo names don’t forget to fix it in all the bellow commands. And of course you need to change username.
I used the following folder structure:
~/linksblog
   |-- links
   |-- build
   |-- spectre-pixel
   |-- ssh
To create it:
mkdir -p ~/linksblog/build
mkdir ~/linksblog/ssh
Create the Hugo blog and initialize git. The hugo new site command will create the links folder.
cd ~/linksblog
hugo new site links
git init
git add -A .
git commit -m "Initialize Hugo repo"
git branch -M main
Now add the GitHub remote repository. It assumes you can access GitHub using SSH. In the desktop you can use HTTPS access but the mobile client will be configured with a deploy key only. Easier to keep it all consistent with SSH.
git remote add origin git@github.com:username/links.git
Next step is to create and initialize the build folder, and sync to GitHub. Git doesn’t seem to like empty repos so we just add an empty README to make it happy. The following commands assume that we are inside the linksblog folder.
cd ~/linksblog
cd build
git init
touch README
git add README
git commit -m "Initialize build repo"
git branch -M main
git remote add origin git@github.com:username/linksbuild.git
git push -u origin main
For theme I selected Spectre Pixel.
cd ~/linksblog
git clone https://github.com/st-wong/hugo-spectre-pixel-theme.git spectre-pixel
cd spectre-pixel
git remote set-url origin git@github.com:username/spectre-pixel.git
These commands clone the theme repository and change its origin to the private repository instead of the original one. Could have set a different remote name but it’s just cleaner this way.
Now we have to add the submodules to the Hugo blog folder and sync everything to GitHub. By default Hugo outputs the static pages to the public folder and themes are located in the themes folder.
cd ~/linksblog/links
git submodule add ssh://git@github.com/username/linksbuild.git public
git submodule add ssh://git@github.com/username/spectre-pixel.git themes/spectre-pixel
git commit -m "add submodules"
git push -u origin main
The last step is to create all the necessary SSH keys. A deploys key can only be used in a single repository. The key is rejected if you try to use it in multiple repositories. Do not set a passphrase in any of these keys.
cd ~/linksblog/ssh
ssh-keygen -t ed25519 -f action_build -C "ssh://git@github.com/username/linksbuild.git"
ssh-keygen -t ed25519 -f action_theme -C "ssh://git@github.com/username/spectre-pixel.git"
ssh-keygen -t ed25519 -f webserver -C "ssh://git@github.com/username/linksbuild.git"
ssh-keygen -t ed25519 -f mobile -C "ssh://git@github.com/username/links.git"
The action_build and action_theme keys will be used by the links repository. The GitHub Action will be configured there and it will need access to the other private repositories. It just needs read-only access to spectre-pixel repo, and read/write to linksbuild repository to push the newly generated content.
The webserver key is to be used by the server to pull from the linksbuild repository (read-only), and the mobile key is used by the mobile device to edit and update blog data (read/write).
You might have noticed the -C option. This option sets a comment in the key and is the solution for the multiple keys problem mentioned earlier. GitHub handling of SSH connections is such that it will accept the first known key. Not sure if this is protocol limitation between SSH and Git. This limitation will create problems with the linksbuild repo where we need to configure two keys. If the keys are generated without that specific comment, the user of the second key will have access denied error when trying to access the repo.
The solution is to add a comment to the key with the repository URL where the key will be used in. The problem is described here and here.
When using Github deploy keys, GitHub servers will accept the first known key. But since deploy keys are scoped to a single repository, this might not be the key needed to access a particular repository. Thus, you will get the error message fatal: Could not read from remote repository. Please make sure you have the correct access rights and the repository exists. if the wrong key/repository combination is tried.
To support picking the right key in this use case, this action scans key comments and will set up extra Git and SSH configuration to make things work.
1 When creating the deploy key for a repository like git@github.com:owner/repo.git or https://github.com/owner/repo, put that URL into the key comment.
Now we need to configure the keys for each repository. The links repository is where the GitHub Action workflow will be executed, and needs access to the other private repositories. This means we need to store the private keys we just generated. GitHub encrypted secrets feature is the right tool for this job. We can safely store (one hopes…) the private keys there and they will be made accessible to the workflow when executed. This way we don’t need to store private keys in the git repository itself (storing passwords and keys in public git repositories, a frequent GitHub information security tragedy).
Secrets are configured per repository, so go to links repository settings, then Secrets menu, and click New repository secret.
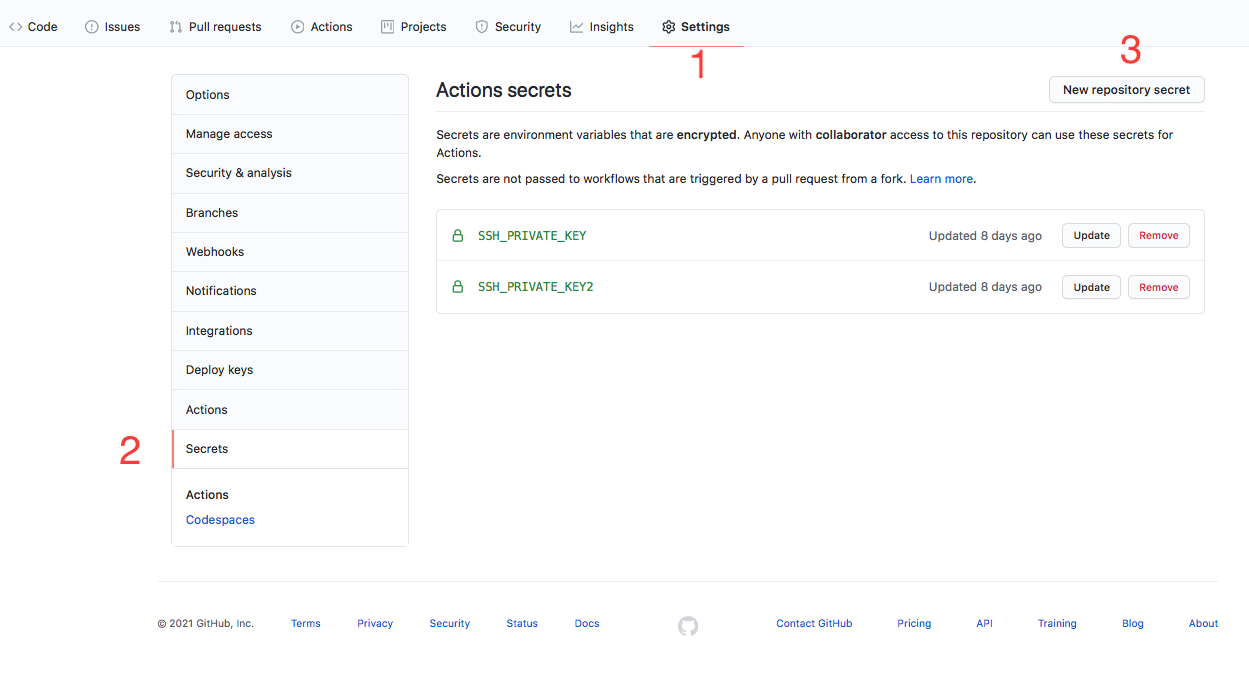
Set the name to SSH_PRIVATE_KEY and paste the content of action_build file. The content should be similar to this:
-----BEGIN OPENSSH PRIVATE KEY-----
(...)
-----END OPENSSH PRIVATE KEY-----
Do the same for the action_theme key, naming it SSH_PRIVATE_KEY2. The private keys will be accessible in the workflow script via ${{ secrets.SSH_PRIVATE_KEY }} and ${{ secrets.SSH_PRIVATE_KEY2 }} variables.
Now we need to add each public key in the correct repository. The action_build.pub contents should be added in linksbuild repository with read/write access. And the action_theme.pub contents to the spectre-pixel repository with read-only access.
To achieve this, go to the repository settings, Deploy keys, and click Add deploy key. Set a title such as github action and paste the contents of the corresponding public key for the repository. Set write access when configuring the linksbuild public key.
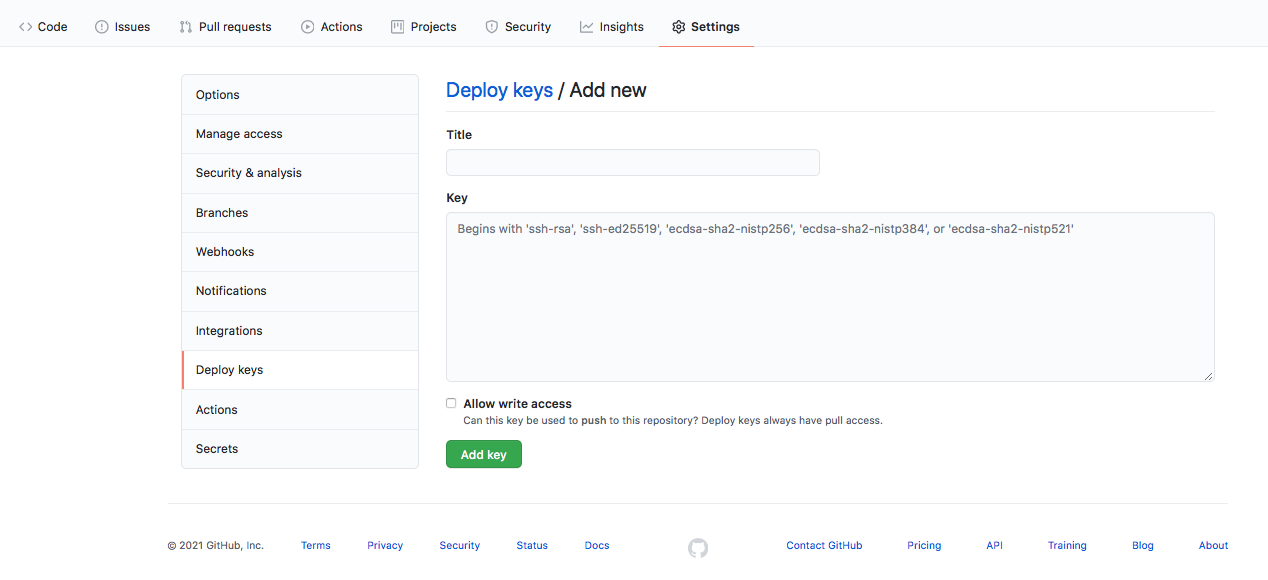
In the linksbuild repository you should also add the webserver public key, with read-only access. Finally, in the links repository the ipad.pub key needs to be set with read/write access, since the mobile device should have commit access.
In the end the configuration should match this:
- Two SSH private keys configured as secrets in
links. - Mobile device public key configured as read/write deploy key in
links. - Action build public key configured as read/write in
linksbuild. - Webserver public key configured as read-only in
linksbuild. - Action theme public key configured as read-only in
spectre-pixel.
The setup is ready and now we can create the workflow in the links repo.
The workflow can be created and edited via the website or in the desktop repository and then pushed to GitHub. The latter is done by creating the .github/workflows in the root of links repo. In the GitHub website, just click in Actions and then New workflow. We don’t need a template so choose set up a workflow yourself option in the Choose a workflow template screen.
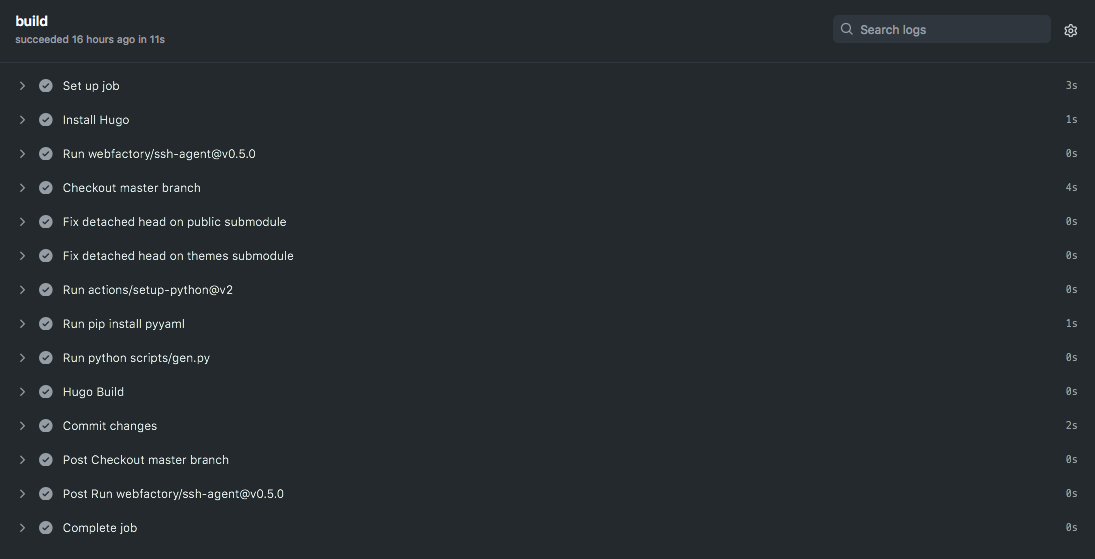
This is the workflow I use:
name: Generate Hugo

defaults:
  run:
    shell: bash

# Controls when the action will run.
on:
  # Allows you to run this workflow manually from the Actions tab
  workflow_dispatch:
  # branch to deploy
  push:
    branches:
      - main

# A workflow run is made up of one or more jobs that can run sequentially or in parallel
jobs:
  # This workflow contains a single job called "build"
  build:
    # The type of runner that the job will run on
    runs-on: ubuntu-latest

    # Steps represent a sequence of tasks that will be executed as part of the job
    steps:
      - name: Install Hugo
        env:
          HUGO_VERSION: 0.81.0
        run: |
          mkdir ~/hugo
          cd ~/hugo
          curl -L "https://github.com/gohugoio/hugo/releases/download/v${HUGO_VERSION}/hugo_${HUGO_VERSION}_Linux-64bit.tar.gz" --output hugo.tar.gz
          tar -xvzf hugo.tar.gz
          sudo mv hugo /usr/local/bin
      # add the private key to the ssh-agent
      # the private repo is referenced via ssh so the key will be used
      # from the agent when doing the checkout
      - uses: webfactory/ssh-agent@v0.5.0
        with:
          ssh-private-key: |
                ${{ secrets.SSH_PRIVATE_KEY }}
                ${{ secrets.SSH_PRIVATE_KEY2 }}

      # Checks-out your repository under $GITHUB_WORKSPACE, so your job can access it
      - name: Checkout master branch
        uses: actions/checkout@v2
        with:
          submodules: recursive

      - name: Fix detached head on public submodule
        run: |
          cd public/
          git checkout main
      - name: Fix detached head on themes submodule
        run: |
          cd themes/spectre-pixel
          git checkout main

      - uses: actions/setup-python@v2
      - run: pip install pyyaml

      - run: python scripts/gen.py

      - name: Hugo Build
        run: hugo -t spectre-pixel

      - name: Commit changes
        run: |
          cd public

          git config --local user.email "actions@github.com"
          git config --local user.name "GitHub Action"

          git add -A .

          if git diff-index --quiet HEAD --; then
            echo "No changes..."
          else
            git commit -m "[CI] build hugo static site"
            git push -u origin main
          fi
Let me try to explain each part.
The first part, on, defines when the action will be run. Different triggers are possible, such as manual, scheduled, on commits, etc. Check the events documentation.
# Controls when the action will run.
on:
  # Allows you to run this workflow manually from the Actions tab
  workflow_dispatch:
  # branch to deploy
  push:
    branches:
      - main
To test the workflow it is useful to run it manually, so that’s what workflow_dispatch: does. The push option configures the workflow to execute on each push to the repository. In this case on every push to the main branch.
GitHub free account allows 2000 minutes per month for Actions work. This is a lot of time unless the action takes too long or you have frequent commits. Since the trigger happens only on main branch, the solution to avoid hitting limits is to make changes in a different branch and only merge to main when you want to trigger the workflow.
The next part is the chain of jobs that we want executed. Since each workflow is executed in a new Docker instance, we need to setup our environment on every execution. Maybe there is a way to use a pre-configured Docker image with GitHub instead of wasting computer and network resources on every execution. I didn’t bother to research and RTFM and most people don’t seem to also care. Anyway, my workflow takes an average of 30 seconds to complete so not worth the effort. I’m not paying for the service and those resources so why waste my time now.
Multiple (and dependent) jobs can be defined but in this case we just need a single job that takes care of everything (errors are fatal so no need for dependencies here). Let me describe each step of this job.
      - name: Install Hugo
        env:
          HUGO_VERSION: 0.81.0
        run: |
          mkdir ~/hugo
          cd ~/hugo
          curl -L "https://github.com/gohugoio/hugo/releases/download/v${HUGO_VERSION}/hugo_${HUGO_VERSION}_Linux-64bit.tar.gz" --output hugo.tar.gz
          tar -xvzf hugo.tar.gz
          sudo mv hugo /usr/local/bin
As the name says, this job will take care of installing Hugo in the Docker instance. It will download the specified version from Hugo releases page, unpack it, and move to the executable path. Sometimes your theme and customizations might not be compatible with newer Hugo versions so this allows to specificy the required version. Instead of downloading the release we could probably add the file to the repo and use it as the source (or whatever fancy cache mechanism or something else available).
The next step adds the SSH keys to the ssh-agent since the build will need to access the other private repositories.
      # add the private key to the ssh-agent
      # the private repo is referenced via ssh so the key will be used
      # from the agent when doing the checkout
      - uses: webfactory/ssh-agent@v0.5.0
        with:
          ssh-private-key: |
                ${{ secrets.SSH_PRIVATE_KEY }}
                ${{ secrets.SSH_PRIVATE_KEY2 }}
This uses the webfactory/ssh-agent third-party action. I didn’t really explored what are the implications of using third-party actions. My spidey sense tells me this is weird and not something I really like, but it’s not that important data so I didn’t bothered to understand what’s the threat and risk model here. It’s open source so for sure there is someone checking if everything is fine (sarcasm in case you missed it…). While revising the initial draft I found documentation about third-party actions risks:
This means that a compromise of a single action within a workflow can be very significant, as that compromised action would have access to all secrets configured on your repository, and can use the GITHUB_TOKEN to write to the repository. Consequently, there is significant risk in sourcing actions from third-party repositories on GitHub.
So instead of using the version tag we should use the SHA value of the specific commit we want to use. In above case, we need to replace @v0.5.0 with @commit_SHA256. Trust is cheap these days so most people will not bother to audit the code and pin the commit. I didn’t either since it’s already enough devops and fancy web tech for today. Supply chain attacks are trendy!
What this action allows is to add the private keys stored in GitHub secrets to the ssh-agent otherwise the checkout from the other two private repositories would fail. The action authors describe the manual process so we could have used that instead and avoid trusting third-party code. Devops style is great, clone the world, trust and don’t bother!
Next step is to get the links repository in the Docker instance. Without this step the repository contents would not be available inside the Docker instance. This is pretty much a must have step if you want to do anything with repository data. Since we have configured submodules, the recursive option is set. This action is from GitHub and their code can be found here.
      # Checks-out your repository under $GITHUB_WORKSPACE, so your job can access it
      - name: Checkout master branch
        uses: actions/checkout@v2
        with:
          submodules: recursive
The next two steps fix the git status for the submodules we just checked out, otherwise they would not be in the correct commit.
      - name: Fix detached head on public submodule
        run: |
          cd public/
          git checkout main
      - name: Fix detached head on themes submodule
        run: |
          cd themes/spectre-pixel
          git checkout main
There is one final step to finish environment setup. I run a Python script that needs the PyYaml module. These are two unnamed steps to setup Python and install the module.
      - uses: actions/setup-python@v2
      - run: pip install pyyaml
We can finally generate the updated static pages. The first step is to create all the posts. Instead of manually creating each post file in content/post folder, I edit a yaml data file for each month of the year. This is faster to edit from a mobile device. Instead of storing a post file per day, all the posts are dynamically generated in this step. I am not going to have insane amount of entries so this should have no scalability problems, and if somehow the Python script becomes too slow I can convert it to Go.
      - run: python scripts/gen.py

      - name: Hugo Build
        run: hugo -t spectre-pixel
The gen.py script is posted below (some really dirty Python). I use short field names so I don’t need to type a lot in the mobile device for each new entry. There is also an optional comment field for links I want to add a short comment.
#!python3
#
# script to generate posts
# yaml data file format:
#2021-03-02:
#  - n: "teste"
#    u: "https://put.as"
#    c: "comment"

import io
import os
import yaml

try:
    os.makedirs('content/post')
except OSError as e:
    if e.errno != errno.EEXIST:
        raise

with os.scandir("data") as it:
    for entry in it:
        if entry.name.endswith(".yaml") and entry.is_file():
            with open(entry.path, 'r') as file:
                data = yaml.safe_load(file)
                for i in data:
                    with open("content/post/{0}.md".format(i), 'w') as f:
                        f.write("+++\n")
                        f.write("title = \"{}\"\n".format(i))
                        f.write("author = \"fG!\"\n")
                        f.write("date = \"{}\"\n".format(i))
                        f.write("+++\n")
                        for y in data[i]:
                            try:
                                # check if a comment exists and use it
                                if "c" in y:
                                    f.write("- [{0}]({1}) - {2}\n".format(y['n'], y['u'], y['c']))
                                else:
                                    f.write("- [{0}]({1})\n".format(y['n'], y['u']))
                            except:
                                pass
After gen.py finishes the static pages are finally generated using the configured theme (this can be set in config.toml but I am used to specify it in the command line). If no errors occured the public folder will have the newly generated content. Remember that this folder is a submodule of the linksbuild repository. So the last step is to commit the updated files and let git deal with changes. There should be no conflits, etc, because only the workflow is commiting to the linksbuild repository.
      - name: Commit changes
        run: |
          cd public

          git config --local user.email "actions@github.com"
          git config --local user.name "GitHub Action"

          git add -A .

          if git diff-index --quiet HEAD --; then
            echo "No changes..."
          else
            git commit -m "[CI] build hugo static site"
            git push -u origin main
          fi
The git email and username need to be configured before commiting to the buil repo. Not sure there is a simple way to avoid issuing the command all the time. Next we let git deal with the changes by adding all the files in the public folder, and if changes exist commit and push to linksbuild repo. The commit message is fixed but it could be modified to something more useful such as build number, source hash of links repository, etc. The linksbuild history is only relevant to the machines so I don’t care about that information.
If the workflow executed without errors, an updated site version is available in linksbuild HEAD.
Now we need to get the data to the web server. I created a crontab job in the server that does a git pull from linksbuild. The webserver private key is set in the web user home and added this entry to its SSH config:
Host github.com
    Hostname github.com
    IdentityFile ~/.ssh/webserver
In the webserver folder configured for the site we just need to manually execute the initial git clone.
git clone ssh://git@github.com/username/linksbuild.git
Don’t forget to configure your web server to deny access to the .git folder. An alternative is to clone to an outside folder and then sync the files with the web server folder. Because everything is automated and we don’t manually edit the copy in the server, the crontab process should have no git conflicts at all and git will do all the dirty syncing work for us. My cron job is set to execute every 30 minutes. I might have a few updates during the day but a 30 minutes turnaround is good enough, and maybe too frequent. My server costs are fixed, the GitHub end is not my cost, so why bother (shouldn’t trigger any GitHub limits anyway). Free services FTW!
The last piece of this puzzle is the mobile device. For iOS Working Copy appears to be the best app for the job. It supports SSH keys, looks nice and works well. The ability to push to remote costs you $19.99 (or whatever price in your own currency). This unlocks the current pro features forever and new ones developed over the next 12 months. After that you need to pay again to unlock new pro features. Seems like a reasonable licensing model. Initially I thought it was a subscription and that would be a deal breaker to me. The features I need are already there so I am ok.
Just transfer the mobile private key generated via Airdrop or some other way, import it, add the remote links GitHub repository, and you are set. Edit a file, commit, push to remote, and watch the machines doing all the dirty work for you.
It’s not very complicated setup and works nicely. I just copy paste links into the data file, commit, and let the machines do the work for me.
Have fun,
fG!
References:
- https://blog.euc-rt.me/posts/github-actions-publish-private-hugo-repo-to-public-pages-site/
- https://www.webfactory.de/blog/use-ssh-key-for-private-repositories-in-github-actions
- https://www.andrewconnell.com/blog/automated-hugo-releases-with-github-actions/
- https://medium.com/zendesk-engineering/a-github-actions-workflow-to-generate-publish-your-hugo-website-f36375e56cf7
- https://matt-harrison.com/posts/github-actions-hugo/
- https://daredevel.com/post/2020-02-11-continous-deploying-of-hugo-based-website-with-github-actions/
- https://cameronbroe.com/posts/super-powered-blogging-hugo-github-pages-actions/