Note: the original post was written in 2017 when there weren’t many posts discussing direct attacks to firmware flash. It also took a while to get in touch with the ISP to give them a chance to fix some of the issues described (in particular the ACS access) and then it was left in draft mode until today. I just made a quick revision and fixed quite a few dead links.
I also made two presentations about this topic at the 0xOPOSEC meetup in Porto in 2019, further advancing the initial research presented in this post (how to attach a debugger, reverse engineering the passwords algorithm, etc).
You can grab them here:
- Part 1: OpoSec Set 2019 - Hacking Your Cable Modem
- Part 2: OpoSec Out 2019 - Reverse Engineering Your Cable Modem
For quite some time I wondered what kind of backdoors could be found on my ISP’s cable modem. There are way too many security reports and blog posts about backdoors and security issues in all kind of network equipment so probabilities are that this one would not be an exception.
The current models (in 2017 but newer ones are even shittier ;-)) in use by my ISP had public reports about certain remote access issues with a default password. These issues allegedly have been fixed by restricting ISP remote access to certain IP addresses. This doesn’t make it very assuring so it was time to finally take a look.
A quick browsing in second hand sites and I found out a sweet deal on a similar cable modem (we don’t want to potentially destroy the modem that connects us to the Internet). My current Portuguese ISP is NOS, previously known as ZON before a merger with Optimus. My active modem is ZON branded while the one I bought is NOS branded. Their shellcase is very similar but the hardware versions are different. One is a BVW-3653 and the other a CVE-30360, both manufactured by Hitron Technologies.
The operating system and core software are provided by Jungo/OpenRG (bought by Cisco and now Cisco RG). Security issues related to web management and other features (Samba server for example) can be found online.
In this post I am mostly interested in directly attacking the hardware instead of finding vulnerabilities in the web management such as typical arbitrary command execution and shell access.
Both modems have two default accounts, home and home_admin. The home account (password is zonnet) is given to the user, while home_admin (password is zonnetadmin) isn’t announced but can be found online. There is at least an admin account which on the new router also had admin default password, but on my active modem the current password is unknown. Allegedly there are also other accounts used for remote management (and they do exist on working modems). All these “extra” accounts are hidden from the regular users described above.
Besides the default web administrative console running on port 80 (by default only active on the LAN interfaces) there is another administrative port running on 7654. This port is remotely accessible on the external interface and has a default acs account username, and password equal to username. Currently we can connect to this port with default username/password but we only get a 405 Method Not Allowed result. Allegedly the access is restricted to a certain range of ISP addresses.
The assumption is that this is a remote management feature provided by Jungo/OpenRG. There were many rumours regarding ISP remote access on this port reported by people contacting tech support. In theory this makes some sense since ISPs have large user bases, and most are technically illiterate making support a nightmare unless there is remote access. But the theoretical advantage also creates unnecessary security risks. At least the users should be given an option about enabling or not this kind of service, which does not exist. A single vulnerability in this remote management feature and thousands of modems can be transformed into a broadband botnet. Not exactly something novel (Mirai, etc).
Enough introduction, let’s dive into hardware hacking.
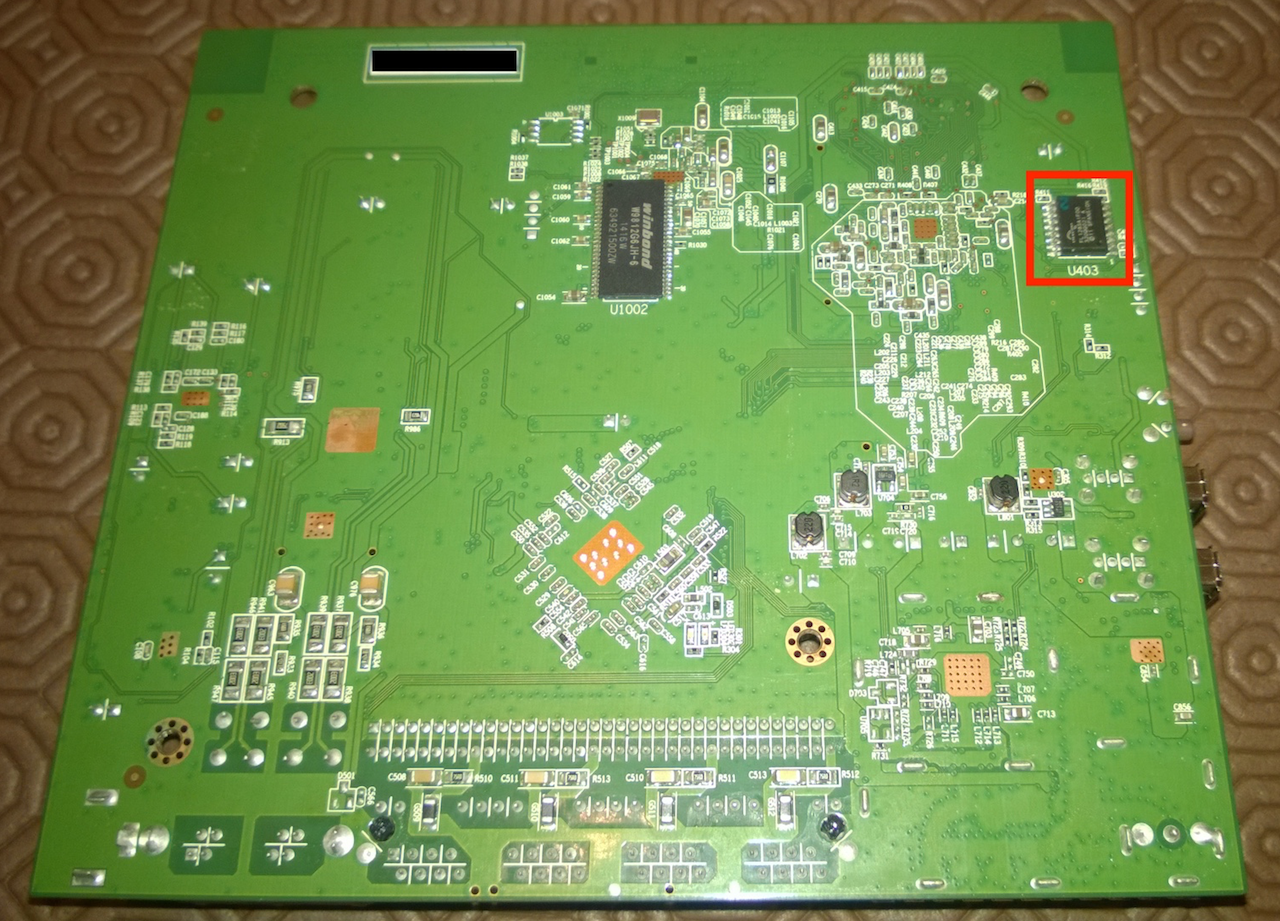
The following pictures show the top and bottom layers of the CVE-30360 board. In this model the WiFi antennas are included in the board (top left and right), while in the BVW model they are “external”. Both models feature four LAN ports and two VOIP phone ports (ZON/NOS offers a so called triple play service - TV, Internet and phone). The two USB ports can be used for file and print sharing.
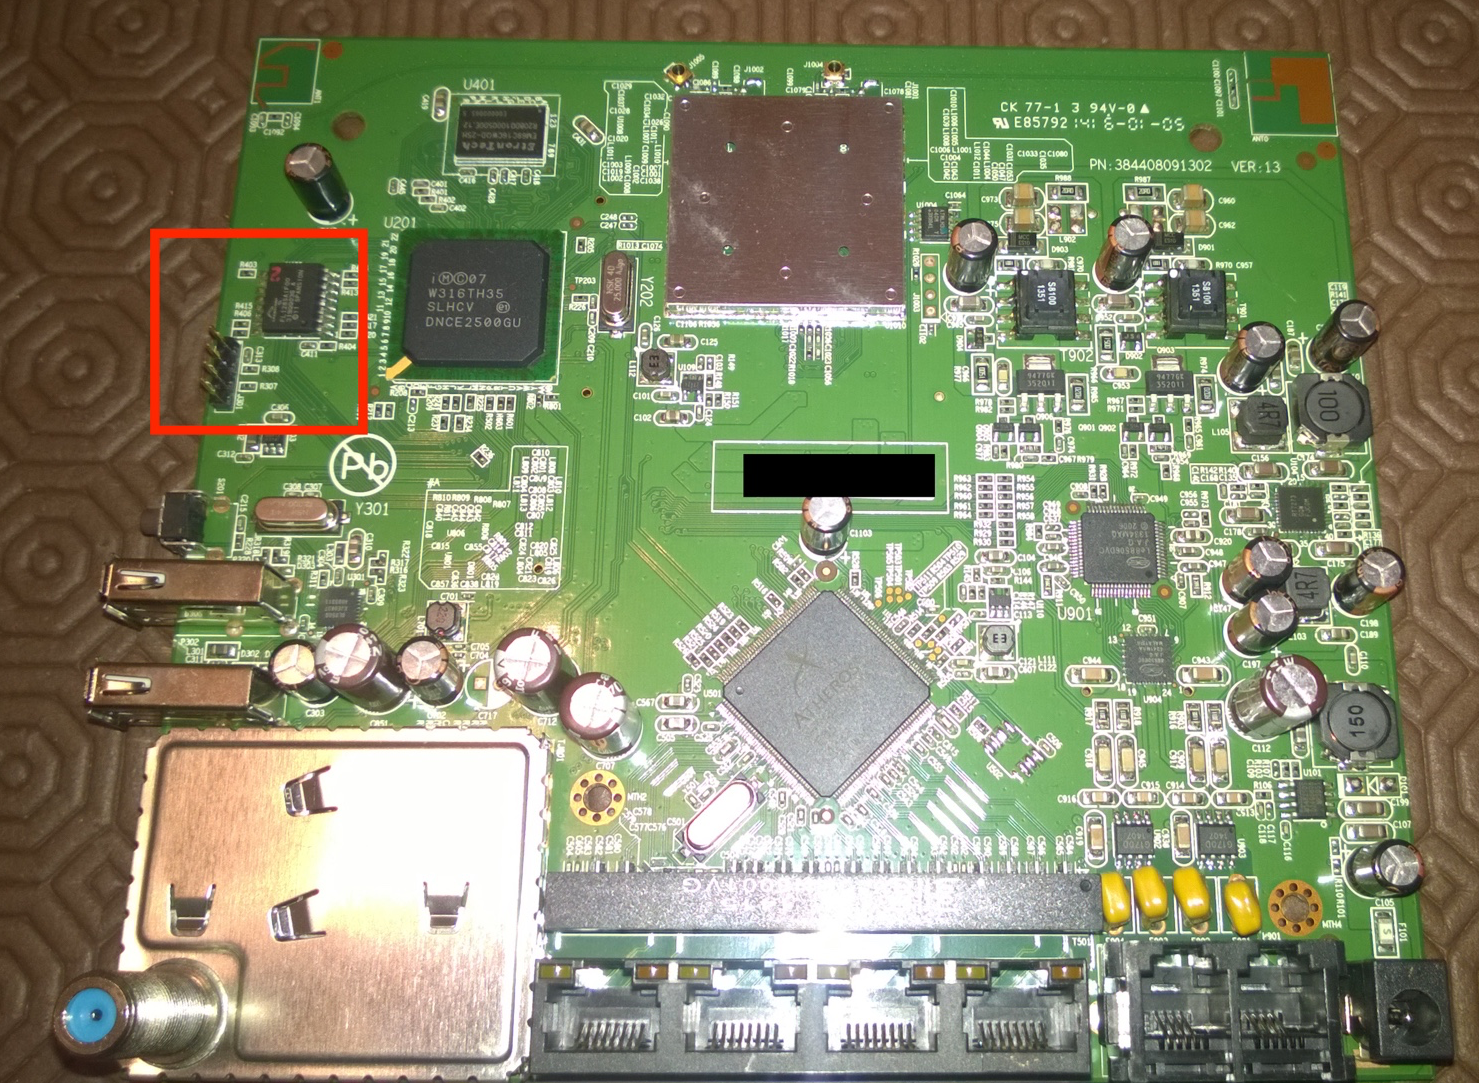
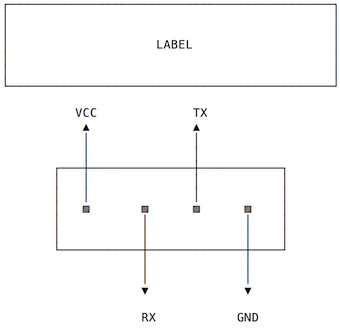
Embedded devices hacking usually starts by locating the serial and/or JTAG ports. In both modems the serial port is easy to locate because both have a four pin header. This is definitely the first thing we should try to poke around.
Serial console access requires a minimum of three pins - ground, transmit (TX) and receive (RX). These two posts (here and here) describe techniques to find out what each pin does. Essentially you just need a multimeter and a couple of reboots (a logic analyser is a plus but not really necessary most of the time). Modern computers don’t have a serial port so we need a serial to USB adapter. There are many devices on the market, from super cheap to moderately expensive. I have a Shikra, a cheap Miracle TTL I bought at SyScan360 Beijing, a Teensy, and a few others. Anything based on FT232 is usually a safe bet for this task (even all the fakes and clones unless they were firmware bricked.
A couple of months ago I had already poked around and established serial connection to my active modem. But the only output I got out of the serial console was just a uncompressing Linux kernel message and then silence. The same issue happens in this new model. This means that the serial connection is well established but the system is not sending any output to the serial. We shall see why in a bit.
The pin layout for the CVE model is the following:

And for the BVW:
The serial console at this point is not a good attack vector nor produces useful intelligence about the boot process. Usually we would move towards the JTAG port (assuming it exists and easy to find). But I don’t have any JTAG equipment other than the Shikra and I never played with JTAG before. What’s left in terms of hardware that we can easily target with minimum effort?
Embedded devices usually don’t have hard disks or some other regular storage device so the operating system and software is stored in some kind of flash storage. This is territory that I know rather well from past (U)EFI experiments. A quick look around the board and I easily find a potential candidate SPI flash chip, a 16 pin version (the flash chips used by Macs are all 8 pin versions as far as I have seen). In this case the chip is from Spansion with model number FL128SA1F00, which Google and correspondent datasheet identify as a 16 Mbyte SPI serial flash memory. On the bottom side of the board we find another similar chip, meaning that this model has 32 Mbytes of flash storage. The BVW model uses a single 16Mbyte S25FL128P.
It is always a good procedure to download and read the chip datasheet because while there are compatible commands between different brands there are other commands and flash layouts that you want to know about to adapt your flashing software (assuming you are not using flashrom).
The next step is to open the datasheet to find the pins layout and connect our SPI serial flasher. As described on my EFI slides I use a Teensy 2.0 for this task. There are many other devices on the market that can be used (hardware compatible with flashrom for example). Twenty minutes later and I have a full dump of both flash chips. I recommend you to always do a second dump of the chip and checksum both dump files to see if they match. Sometimes the test probes or chip clip aren’t well connected and you get corrupted dumps (the probability of two exact bad dumps should be extremely low). If two consecutive dumps are different then you have problems - usually cables, probes, or board being powered on and corrupting the dump (usually this means you need to unsolder the chip).
Now we can finally have a look at the flash contents. Something I usually like to do is to load the binary into an hex editor and quickly browse around to see if anything suspicious or useful is visible right away. A couple of bytes from the beginning we find out some interesting strings that appear to be U-Boot parameters, a common bootloader found on embedded devices. One string catches my attention, “silent=1”. A quick Google search and we find the description of this parameter:
“silent: If the configuration option CONFIG_SILENT_CONSOLE has been enabled for your board, setting this variable to any value will suppress all console messages. Please see doc/README.silent for details.”
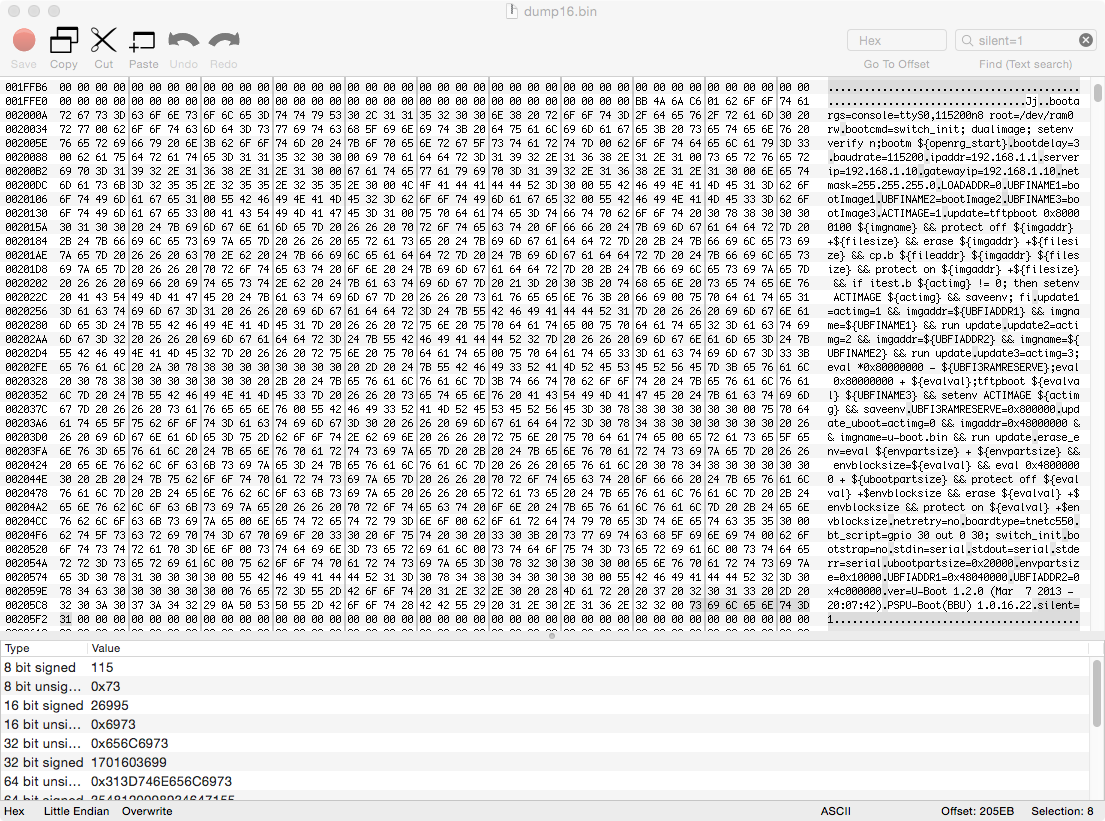
This explains why there is no (meaningful) serial console output. The manufacturer opted for suppressing them in U-Boot configuration. This is something we definitely want to change.
The next step is to try to understand what’s inside the firmware dump. The most used tool for this job is Binwalk. There is a new alternative unblob but didn’t work great the few times I tried with newer projects. For this I used a Debian virtual machine since it seems to be the best supported operating system for Binwalk. Virtual machines are “cheap” so it’s useless to waste time trying to get everything work in macOS (usually it never works first attempt). Running binwalk against both firmware images we have the following output:
$ binwalk 00-Router2-09-05-2016-up.bin

DECIMAL       HEXADECIMAL     DESCRIPTION
--------------------------------------------------------------------------------
88732         0x15A9C         U-Boot version string, "U-Boot 1.2.0 (Mar  7 2013 - 20:07:42)"
132433        0x20551         U-Boot version string, "U-Boot 1.2.0 (Mar  7 2013 - 20:07:42)"
197969        0x30551         U-Boot version string, "U-Boot 1.2.0 (Mar  7 2013 - 20:07:42)"
262144        0x40000         uImage header, header size: 64 bytes, header CRC: 0x372BB75E, created: 2013-09-02 00:34:47, image size: 8363208 bytes, Data Address: 0x80018000, Entry Point: 0x80018000, data CRC: 0xAE6A2F4C, OS: Linux, CPU: ARM, image type: OS Kernel Image, compression type: none, image name: "OpenRG"
275456        0x43400         gzip compressed data, maximum compression, from Unix, last modified: 2013-09-02 00:34:46
16449688      0xFB0098        Zlib compressed data, default compression

$ binwalk 00-Router2-09-05-2016-down.bin

DECIMAL       HEXADECIMAL     DESCRIPTION
--------------------------------------------------------------------------------
0             0x0             uImage header, header size: 64 bytes, header CRC: 0x372BB75E, created: 2013-09-02 00:34:47, image size: 8363208 bytes, Data Address: 0x80018000, Entry Point: 0x80018000, data CRC: 0xAE6A2F4C, OS: Linux, CPU: ARM, image type: OS Kernel Image, compression type: none, image name: "OpenRG"
13312         0x3400          gzip compressed data, maximum compression, from Unix, last modified: 2013-09-02 00:34:46
16187544      0xF70098        Zlib compressed data, default compression
16318616      0xF90098        Zlib compressed data, default compression
16449536      0xFB0000        JFFS2 filesystem, big endian
16515152      0xFC0050        Zlib compressed data, compressed
16515252      0xFC00B4        JFFS2 filesystem, big endian
16543208      0xFC6DE8        Zlib compressed data, compressed
16543328      0xFC6E60        Zlib compressed data, compressed
16543808      0xFC7040        Zlib compressed data, compressed
16544164      0xFC71A4        Zlib compressed data, compressed
16544272      0xFC7210        Zlib compressed data, compressed
16544444      0xFC72BC        Zlib compressed data, compressed
16544812      0xFC742C        Zlib compressed data, compressed
16545072      0xFC7530        Zlib compressed data, compressed
16545552      0xFC7710        Zlib compressed data, compressed
(...)
16735048      0xFF5B48        JFFS2 filesystem, big endian
16735744      0xFF5E00        Zlib compressed data, compressed
16736156      0xFF5F9C        JFFS2 filesystem, big endian
16738228      0xFF67B4        Zlib compressed data, compressed
16738280      0xFF67E8        JFFS2 filesystem, big endian
Binwalk is able to identify U-Boot data and two Linux kernels, one on each flash image (one is the main kernel, the other just a backup), and a lot of compressed data. The next step is to try to extract all this data with binwalk -Me.
But before extracting the data and see what’s inside I wanted to see if I could modify the serial console output. Since we have direct access to the flash contents I just modified the silent=1 option to silent=0 and reflashed. Ten minutes later and we are ready for the moment of truth - will the modem boot the reflashed version or brick? As long we have a good original dump we can always restore it in case of bricking (assuming reflashing works). That is why it’s important to make sure that the first dump is valid. This worked ok and now there is a verbose serial console.
U-Boot 1.2.0 (Mar  7 2013 - 20:07:42)
PSPU-Boot(BBU) 1.0.16.22

DRAM:  128 MB
Flash Spansion S25FL128S(16 MB) found on CS0.
Flash Spansion S25FL128S(16 MB) found on CS1.
Flash: 32 MB
In:    serial
Out:   serial
Err:   serial
Press SPACE to abort autoboot in 3 second(s)
Image sections found:
2. section: type:2; magic 0xfeedbabe; counter 0x9; addr 0x48040000
5. section: type:2; magic 0xfeedbabe; counter 0x6; addr 0x4c000000
Looking for active section/image:
checking section 2... ok: 'Image downloaded from: https://jrms.zon.pt:550/firmwares/openrg.cve30360.v2.4_11_3_7_62_3_52.rms?u=KFpPTiBIVUIgZGF0YQogICh3Ym0K' 0x7f9d08@0x48040000 count:0x9
## Booting image at 48040000 ...
Image Name:   OpenRG
Image Type:   ARM Linux Kernel Image (uncompressed)
Data Size:    8363208 Bytes =  8 MB
Load Address: 80018000
Entry Point:  80018000
OK

Starting kernel ...

Uncompressing Linux........................................................................................................................................................................................................................................................................................................... done, booting the kernel.
Linux version 2.6.16.26 #1 Mon Sep 2 03:34:44 IDT 2013
CPU: ARMv6-compatible processor [410fb764] revision 4 (ARMv6TEJ)
Machine: puma5
Ignoring unrecognised tag 0x00000000
Memory policy: ECC disabled, Data cache writethrough
Reserved 2048k DSP memory starting from Physical 0x87e00000
Reserved 1024k KLOG memory starting from Physical 0x87d00000
CPU0: D VIPT write-back cache
CPU0: I cache: 32768 bytes, associativity 4, 32 byte lines, 256 sets
CPU0: D cache: 16384 bytes, associativity 4, 32 byte lines, 128 sets
Built 1 zonelists
Kernel command line: console=ttyS0,115200n8 root=/dev/ram0 rw boardtype=tnetc552
Interrupt controller revision : 4e822100
PID hash table entries: 512 (order: 9, 8192 bytes)
Power & Sleep Controller @ 0xd8621000 Initialized [id-0x44822905]
USB PHY POR Bypass enabled
Board type: tnetc552
Initialized Peripheral Port Remap Register to base : 0x50000000
HT ZON 8x4 usb pull hight 3 gpio
Puma5 Timer0 initialized
Dentry cache hash table entries: 16384 (order: 4, 65536 bytes)
Inode-cache hash table entries: 8192 (order: 3, 32768 bytes)
Memory: 125MB = 125MB total
Memory: 116864KB available (2136K code, 7651K data, 100K init)
Mount-cache hash table entries: 512

(...)
Entering the U-Boot console gives us access to some interesting commands:
U-Boot 1.2.0 (Mar  7 2013 - 20:07:42)
PSPU-Boot(BBU) 1.0.16.22

DRAM:  128 MB
Flash Spansion S25FL128S(16 MB) found on CS0.
Flash Spansion S25FL128S(16 MB) found on CS1.
Flash: 32 MB
In:    serial
Out:   serial
Err:   serial
Press SPACE to abort autoboot in 3 second(s)
> ?

?       - alias for 'help'
autoscr - run script from memory
base    - print or set address offset
bdinfo  - print Board Info structure
boot    - boot default, i.e., run 'bootcmd'
bootd   - boot default, i.e., run 'bootcmd'
bootm   - boot application image from memory
bootp.- boot image via network using BootP/TFTP protocol
cmp     - memory compare
coninfo - print console devices and information
cp      - memory copy
crc32   - checksum calculation
dualimage - sets openrg_start according to the current active image.
echo    - echo args to console
erase   - erase FLASH memory
eval.- return addition/subraction
exit    - exit script
flinfo  - print FLASH memory information
go      - start application at address 'addr'
gpio.- GPIO/AUX GPIO operation
help    - print online help
iminfo  - print header information for application image
imls    - list all images found in flash
itest.- return true/false on integer compare
loadb   - load binary file over serial line (kermit mode)
loads   - load S-Record file over serial line
loady   - load binary file over serial line (ymodem mode)
loop    - infinite loop on address range
md      - memory display
mm      - memory modify (auto-incrementing)
mtest   - simple RAM test
mw      - memory write (fill)
nm      - memory modify (constant address)
printenv- print environment variables
protect - enable or disable FLASH write protection
rarpboot- boot image via network using RARP/TFTP protocol
reset   - Perform RESET of the CPU
run     - run commands in an environment variable
saveenv - save environment variables to persistent storage
setenv  - set environment variables
sleep   - delay execution for some time
switch_init    - swtich initialization
test    - minimal test like /bin/sh
tftpboot- boot image via network using TFTP protocol
version - print monitor version
>
For example, we can modify the Linux boot arguments and change init to /bin/sh, gaining direct access to the router filesystem. If you try this you will see the filesystem layout and binaries. I didn’t manage to extract them because the network interface wasn’t yet initialized and I didn’t waste much time with this attack path.
At this point I have serial output, boot loader console and have a shell in the system via init. Extracting the system binaries for further exploration and reverse engineering is the next step.
We get back to Binwalk and try to extract whatever is possible. The two most common filesystems found in embedded world are cramfs and squashfs. Squashfs is more common these days, and cramfs mostly found on older systems. From the boot logs we can see that this is rather old software since both U-Boot and Linux kernel are from 2013. One can see how the embedded and IoT devices are broken by design, they will most of the time (or forever) lag in terms of updates, meaning that their security by design is very much questionable (and this excluding the ton of crap and insecure code shipped on all these devices).
Another good toolkit to analyse firmware images is the Firmware-mod-kit project. It has a series of utilities that are able to open and extract the filesystem images. In theory Binwalk will have the same capabilities if you install those utilities. Since Binwalk failed to extract the cramfs filesystems, I tried to use the utilities directly. One of those utilities is cramfs-2.x.
$ cramfsck ~/_00-Router2-09-05-2016-up.bin.extracted/_43400.extracted/24A000.cramfs
	cramfsck: unsupported filesystem features
Houston we have a problem! Somehow this is recognized as a cramfs filesystem but we are unable to play with it. I decided to give a look at its content and there was something different in the flags fields of cramfs header. It seems that Jungo customized cramfs. Google to the rescue and we find information that validates this assumption - Jungo has indeed modified cramfs to support LZMA compression. Valerio Di Giampietro modified the uncramfs utility to support LZMA. You can find his lzma-uncramfs here. Firmware-mod-kit does include this utility but I didn’t noticed it since I had no idea about the reason for the unsupported filesystem error.
$ ~/lzma-uncramfs/lzma-uncramfs unpacked_24A000 24A000.cramfs
[Volume size: 0x6f0000]
[Volume serial: 28c5d12100000000fb0200004a020000]
[Volume name: Compressed]

do file entry
drwxrwxrwx 0/0                64(64)      /
do dir entry

/:
drwxrwxrwx 0/0              1616(1616)    bin
drwxrwxrwx 0/0               604(604)     etc
drwxrwxrwx 0/0                20(20)      home
drwxrwxrwx 0/0              4080(4080)    lib

(...)

[Summary:]
[Total uncompressed size:     18043168]
[Total compressed size:        6861583]
[Number of entries:                586]
[Number of files compressed:       286]
[Number of files expanded:         300]
Magic happens and we finally have the binaries. The second cramfs image contains only the kernel modules.
There was some discussion online about how the openrg binary is in practice the core binary of this system - init is just a bootstrap to this binary. In some way this binary is like launchd in macOS - responsible for managing daemons and everything else.
Poking around the strings is always a good place to start reversing a binary, and we can find the default configuration file embedded in the binary:
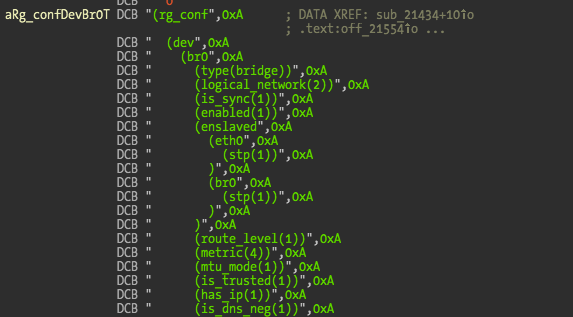
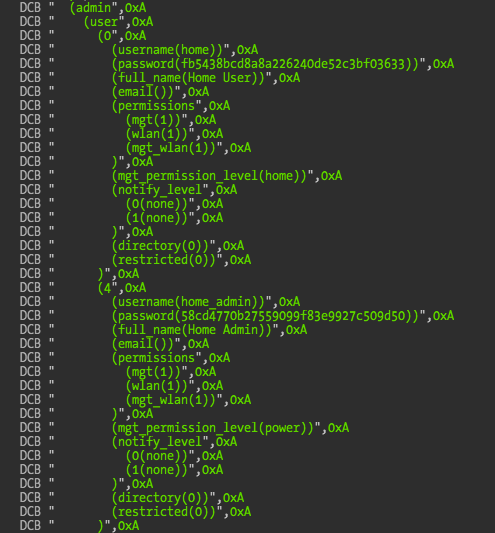
And as usual the default accounts and passwords. The hashes appear to be salted MD5 or a modified MD5 algorithm. I spent a few minutes trying to find the password verification/update functions but couldn’t reach any conclusion. More time is required on this.
One interesting thing that we can see in the boot log is an address for a firmware image, https://jrms.zon.pt:550/firmwares/openrg.cve30360.v2.4_11_3_7_62_3_52.rms. Access to this website requires a client certificate. Assuming that this will also be the same website used by the software to check for available updates then the certificate must be somewhere in the filesystem. Certificates in the filesystem are also a common thing to be found in embedded world. In this case we can find them inside the default configuration file: the client certificate, correspondent private key, and all the necessary CA and Root CA certificates.
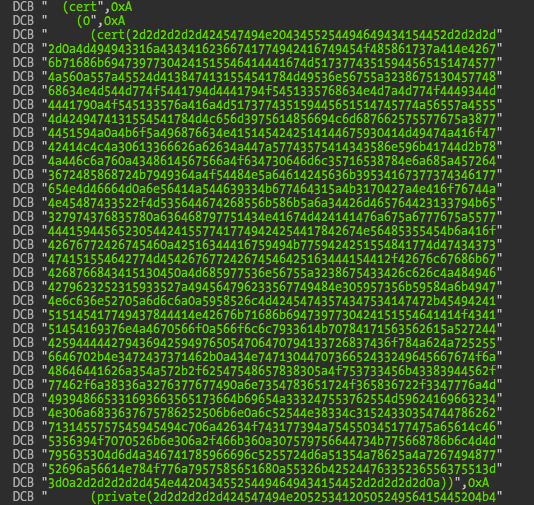
Copy and paste the data into an hex editor and we get the PEM versions for all the certificates. The client certificate can be directly imported into macOS Keychain but the private key needs to be converted first.
$ openssl pkcs12 -export -nocerts -inkey ZonHUB_priv.pem -out ZonHub_priv.p12
This will generate a PKCS12 file that macOS Keychain can understand and import. After we sucessfully import the certificate and private key (you probably want to flag the certificate as trusted to avoid importing the Jungo CA and Root CA), we can try to connect to the https://jrms.zon.pt:550 website. Finally we can download the firmware image found in the logs. Using curl to download the firmware image:
$ curl --insecure --cert-type pem --cert Certificates.p12:123 https://jrms.zon.pt:550/firmwares/openrg.bvw3653_v2.4_11_3_7_86.rms
In this case the PKCS12 password is 123.
One thing that we can easily do is bruteforce the firmware images website, looking for older versions so we can diff changes between updates. Just build some script that iterates over the version numbers and we might get lucky retrieving older firmware files.
Since my sample set is two modems I am unable to make a conclusion regarding the certificate. Is it a shared certificate or unique per modem? The certificates I have are different but also their originator Jungo CA (something like a day difference on the CA certificate). Additional samples are required to be able to answer this question. A shared certificate means a single point of failure because the ISP needs to push an update before revoking the certificate (otherwise the whole customer base is unable to update). If the certificate isn’t revoked we will be able to always connect to the firmware service, which also seems to host the remote management services (ACS), a much juicier target.
The next problem is that I can’t insert a username/password combo at the serial console prompt. I tested with different serial to USB adapters and terminal settings and the problem persists so I didn’t waste too much time on it. My original goal was to find the hidden accounts and their default passwords, since they would enable the ISP remote access (assuming that there are not other backdoors, a too common scenario). But given the unknown salt and unable to login via serial console, I set my eyes on the configuration file. If we can modify it, we can enable telnet access and even set higher privileges in the (default) accounts we already have access to.
The goal now is to modify the active configuration to enable telnet access and configure the users into higher privileged group, which is in this case the super group. The existing groups are, home, power, admin, super, readonly, remote, remote2.
The active configuration must be stored somewhere in the flash chip. The file systems appear to be read-only so there must be some kind of NVRAM partition where data can be written to, as it happens in (U)EFI world. While Binwalk failed to extract a lot of data it also managed to unpack a lot of gzip’ed data. These files are a good target to grep for configuration file strings.
$ grep rg_conf *
Binary file 3400 matches
grep: _3400.extracted: Is a directory
F70098:  (rg_conf
F70098:  (rg_conf_private
Binary file F70098.zlib matches
F90098:  (rg_conf
F90098:  (rg_conf_private
Two of the extracted files from the bottom firmware image appear to have configuration content. One easy way to verify if one of these is the active configuration file is to boot the modem, change something in the configuration (admin information for example), save, and dump again the firmware.
Doing this will reveal that the configuration file at offset 0xF70098 on the bottom flash chip is indeed the active configuration file. Now we have a target that we want to modify.
What we need to do is to modify the group home_admin user belongs to, compress again the file (zpipe.c from zlib.net is perfect for this task), replace original active configuration with ours at offset 0xF70098, and reflash the new firmware image. If it works, the home_admin user will have higher privileges and able to see some hidden menus.
This plan didn’t work and the modem reverted to a default configuration. This means that we made a mistake somewhere and triggered some kind of auto-recovery mode that restores the modem to a known good configuration - the default we saw stored in the openrg binary.
Loading once again the firmware dump into an hex-editor and going to the offset where the configuration file is located we can spot something interesting.
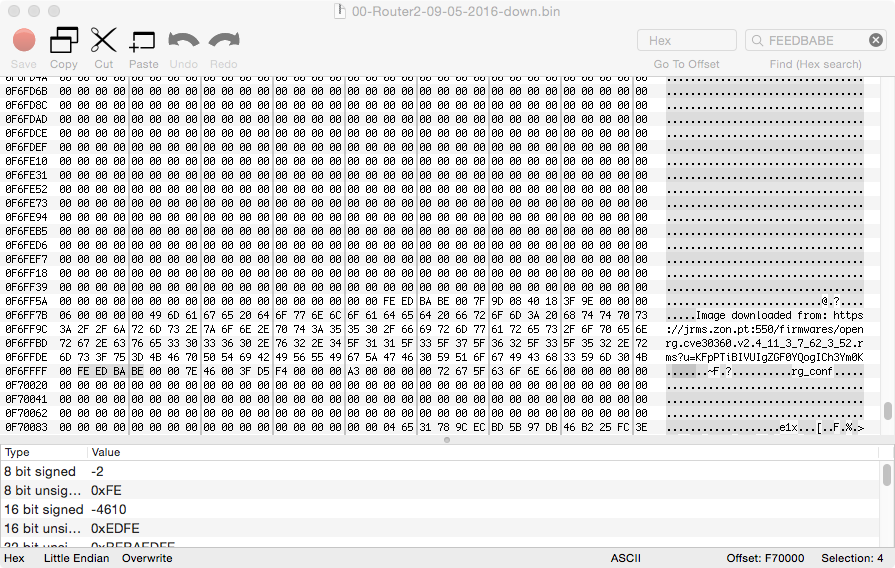
There appears to be a magic constant 0xFEEDBABE just before the configuration file (at offset 0xF70000). The same constant can also be found in U-Boot log when it locates the two kernel images available (check U-Boot output after we enabled serial output). Magic constants are extremely useful to the reverse engineering process since they gives us some clues about the contents or at least something to start searching for. We can find the following description:
“0xFEEDBABE (“feed babe”) is the magic number used to indicate the beginning of an OpenRG flash partition descriptor”
Which takes us to a patch in OpenWRT project with a structure definition:
/* similarly, OpenRG-based boards use additional headers
 * as part of their flash partitioning scheme,
 * which unfortunately include a checksum and length field
 */

/* Note: All fields are in big-endian */
struct openrg_header {
	u32 magic; /* 0xFEEDBABE */
	u32 len; /* Length of file excluding header */
	u32 checksum; /* 32-bit sum of all bytes in file and header, excluding checksum */
	u32 counter; /* Unknown */
	u32 start_offset; /* Unknown */
	u8  name[0x80]; /* Names the file for the CFE flash_layout command */
};
The structure explains right away what happened with our modification - there is a checksum field that we obviously failed to update and when checksum verification failed the modem reverted to default configuration. We have additional clues to keep searching. This time we find an utility able to parse the openrg partition containers where the configuration file is: openrg-image-parser. I extract just the partition for one of the configuration files into an independent file and test. It works and extracts the configuration file. It has a bug because it will segfault against the whole firmware image (it lacks solid error checking and a bogus partition header before the config file on my dump makes it crash).
Now it’s pretty clear what we need to do - we need to build a new partition for the modified configuration file we want to inject. I adapted openrg-image-parser to pack a target file and create a valid openrg partition file. We just need to open the firmware image and the new partition file, and copy the contents of the new partition over the old partition at offset 0xF70000 (or just use dd to do this).
Another reflash, ten minutes later and… it works! We finally have access to the hidden menus that weren’t available to the regular accounts.
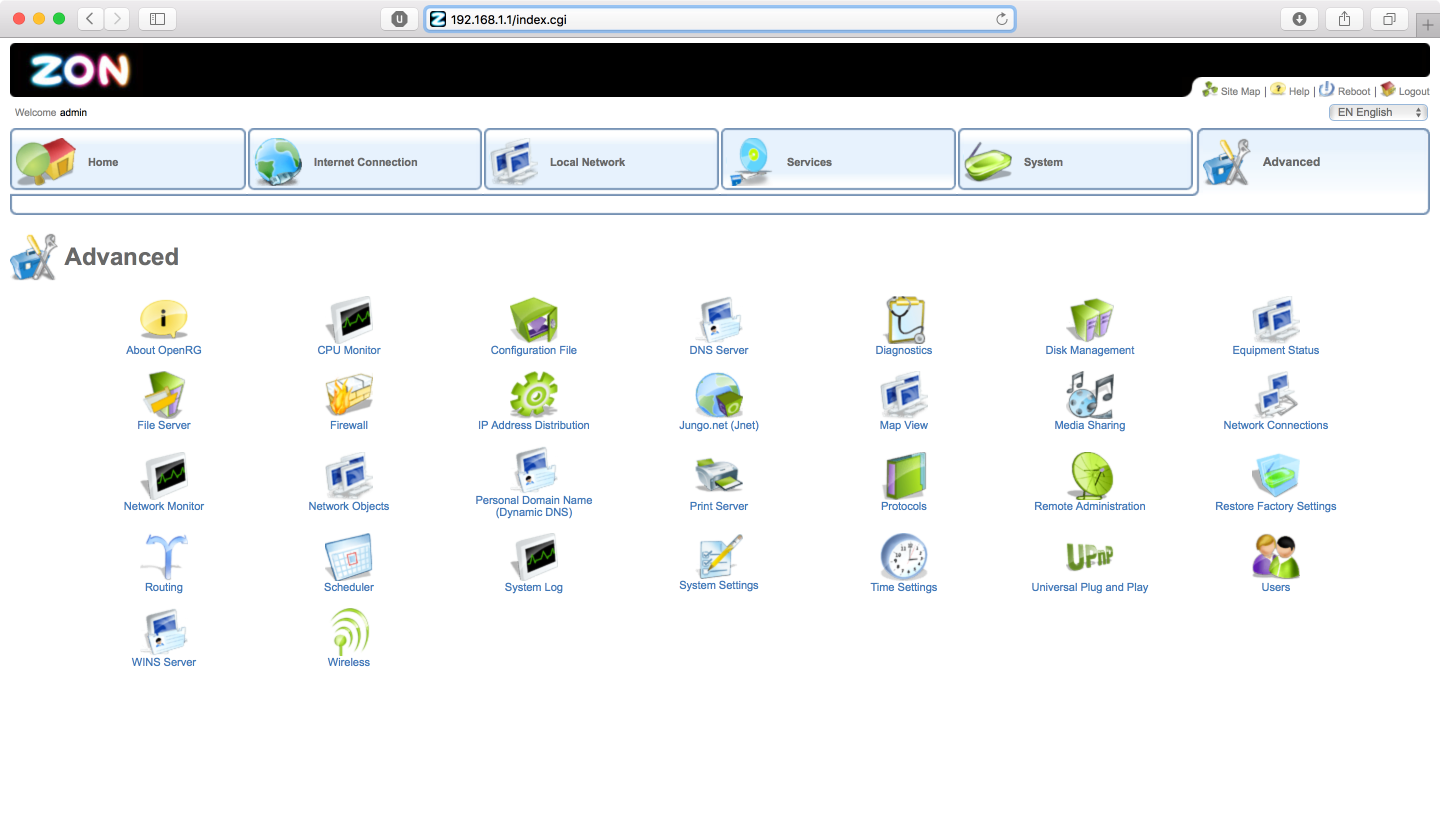
I also enabled telnet access and the same admin account can be used to enter the telnet console. Lots of juicy options available, including potentially interesting remote and local updates.
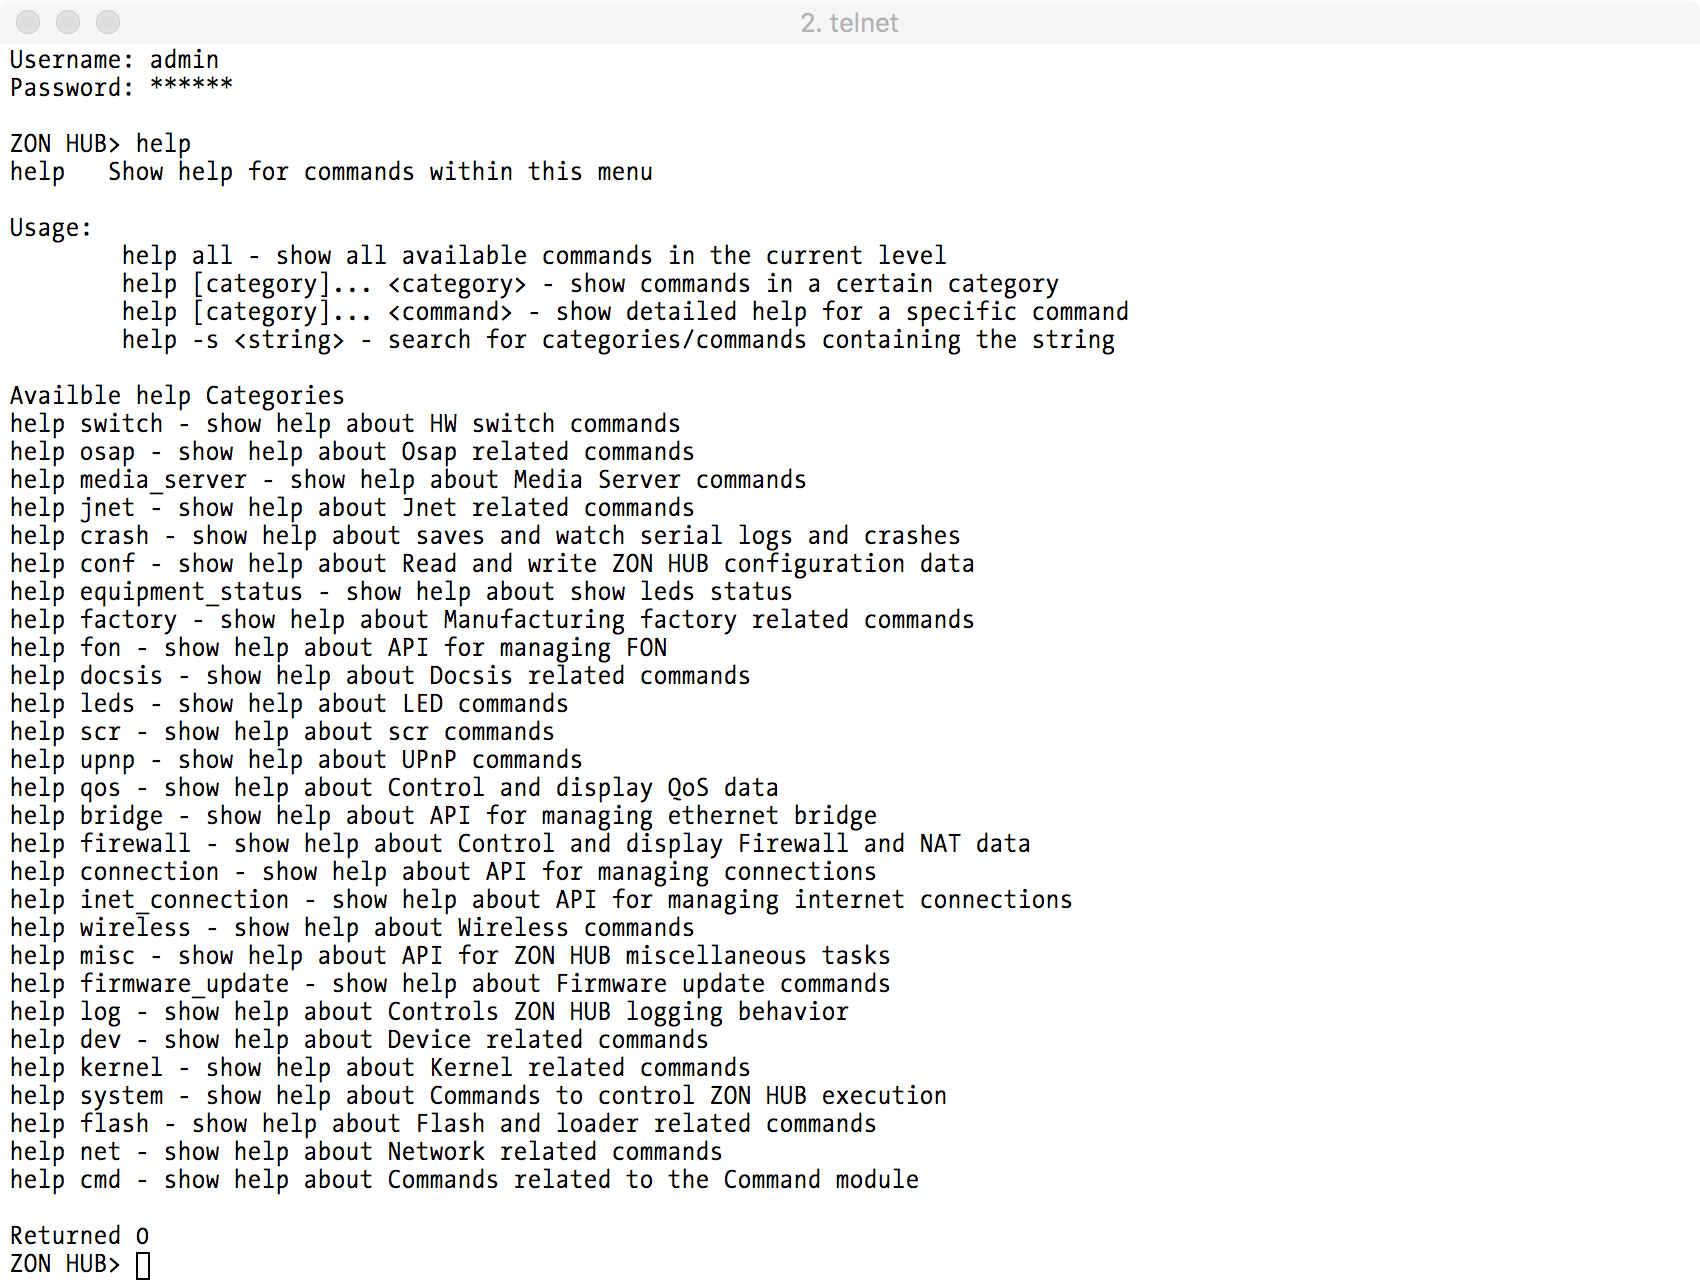
With this we can finally disable all the remote management services from the ISP (Jungo service) and remote accounts. I can’t guarantee yet that this disables pinging for remote updates but now we have full access to the firewall and can at least add a rule to block connections to the updates server. The configuration file contains the following regarding what appears to be remote update feature:
(rmt_upd
  (url(http://update.zon.pt/jungo/openrg/4.11.3.7/openrg-4.11.3.7-BVW3653_V2_ZON.rms))
  (wan_upgrade_type(3))
  (check_interval(900))
  (last_status(ok))
  (is_jcms_outgoing(1))
)
The URL appears to be unavailable but this is probably another configuration option we want to disable.
The next interesting steps are to reverse engineer the main openrg binary and maybe others that can be found in the filesystem. I couldn’t find any utility to repack the modified cramfs filesystem so we might need a tool to do this job. Jungo LZMA modified implementation source code is available on the Internet so this makes the task a bit easier. This is the way we can kill for sure any remote updates and remote access, since we can patch and remove those functions after we are able to repack the file system.
Because Jungo/OpenRG is widely used in many ISPs around the world, this technique shouldn’t be specific to ZON/NOS Portuguese ISP and Hitron branded modems. It should be a solid assumption that the configuration file can be extracted and modified the same way from other vendors with little to no modifications to my version of openrg-image-parser. As long we can easily access the SPI flash chip there should be no trouble attacking the modem. This attack implies of course physical access to the modem. Its advantage is that we have an easy access to the operating system and applications contents, making it easier to research for vulnerabilities that can compromise the whole network - the port 7654 service is a possible juicy research target.
A potentially interesting vector is to compromise the remote management server. Since we were able to extract the certificates used to access it we can try to poke around and compromise that server. This is the configuration file information about it:
(jnet
  (enabled(1))
  (url(https://jrms.zon.pt/jnet_rg2.cgi))
  (wbm_server(jrms.zon.pt))
  (wbm_server_scheme(http))
  (jnet_poke_intvl(64800))
  (tcp_params
		(keep_idl(2400))
		(keep_intvl(75))
		(keep_probe(4))
  )
  (conn_req_username(acs))
  (conn_req_password(1721cffdd6fa0354079963f1f67c0f51))
  (conn_req_port(7654))
  (conn_req_realm(jungo))
  (start_delay(120))
  (wget
		(fast_retry_count(10))
		(fast_retry_sec_min(0))
		(fast_retry_sec_max(600))
		(retry_sec_min(300))
		(retry_sec_max(600))
  )
  (conn_req_url(205561403))
)
Connecting to the CGI doesn’t appear to do anything so this requires further reverse engineering and research. The scenario I had in mind was to compromise this server, after which I assumed access to the whole ISP network, potentially making it possible to compromise every single Hitron modem managed by this service. Of course this is a big if pending further research which will never happen because of potential legal implications (unless the ISP allows it to happen of course). This kind of remote management features creates a (potentially catastrophic) single point of failure and a potential open door to thousands or millions of modems. I discussed this scenario with ISP staff and they told me there is an out-of-band channel that would allow them to update modems in case a malicious firmware was pushed to all modems that disabled their access. This is a DOCSIS protocol requisite according to them (I had some pointers to this documentation but lost it). This is definitely an interesting topic to research to make sure that the out-of-band channel exists and that we have no way to deny access to it. Trust, but verify!
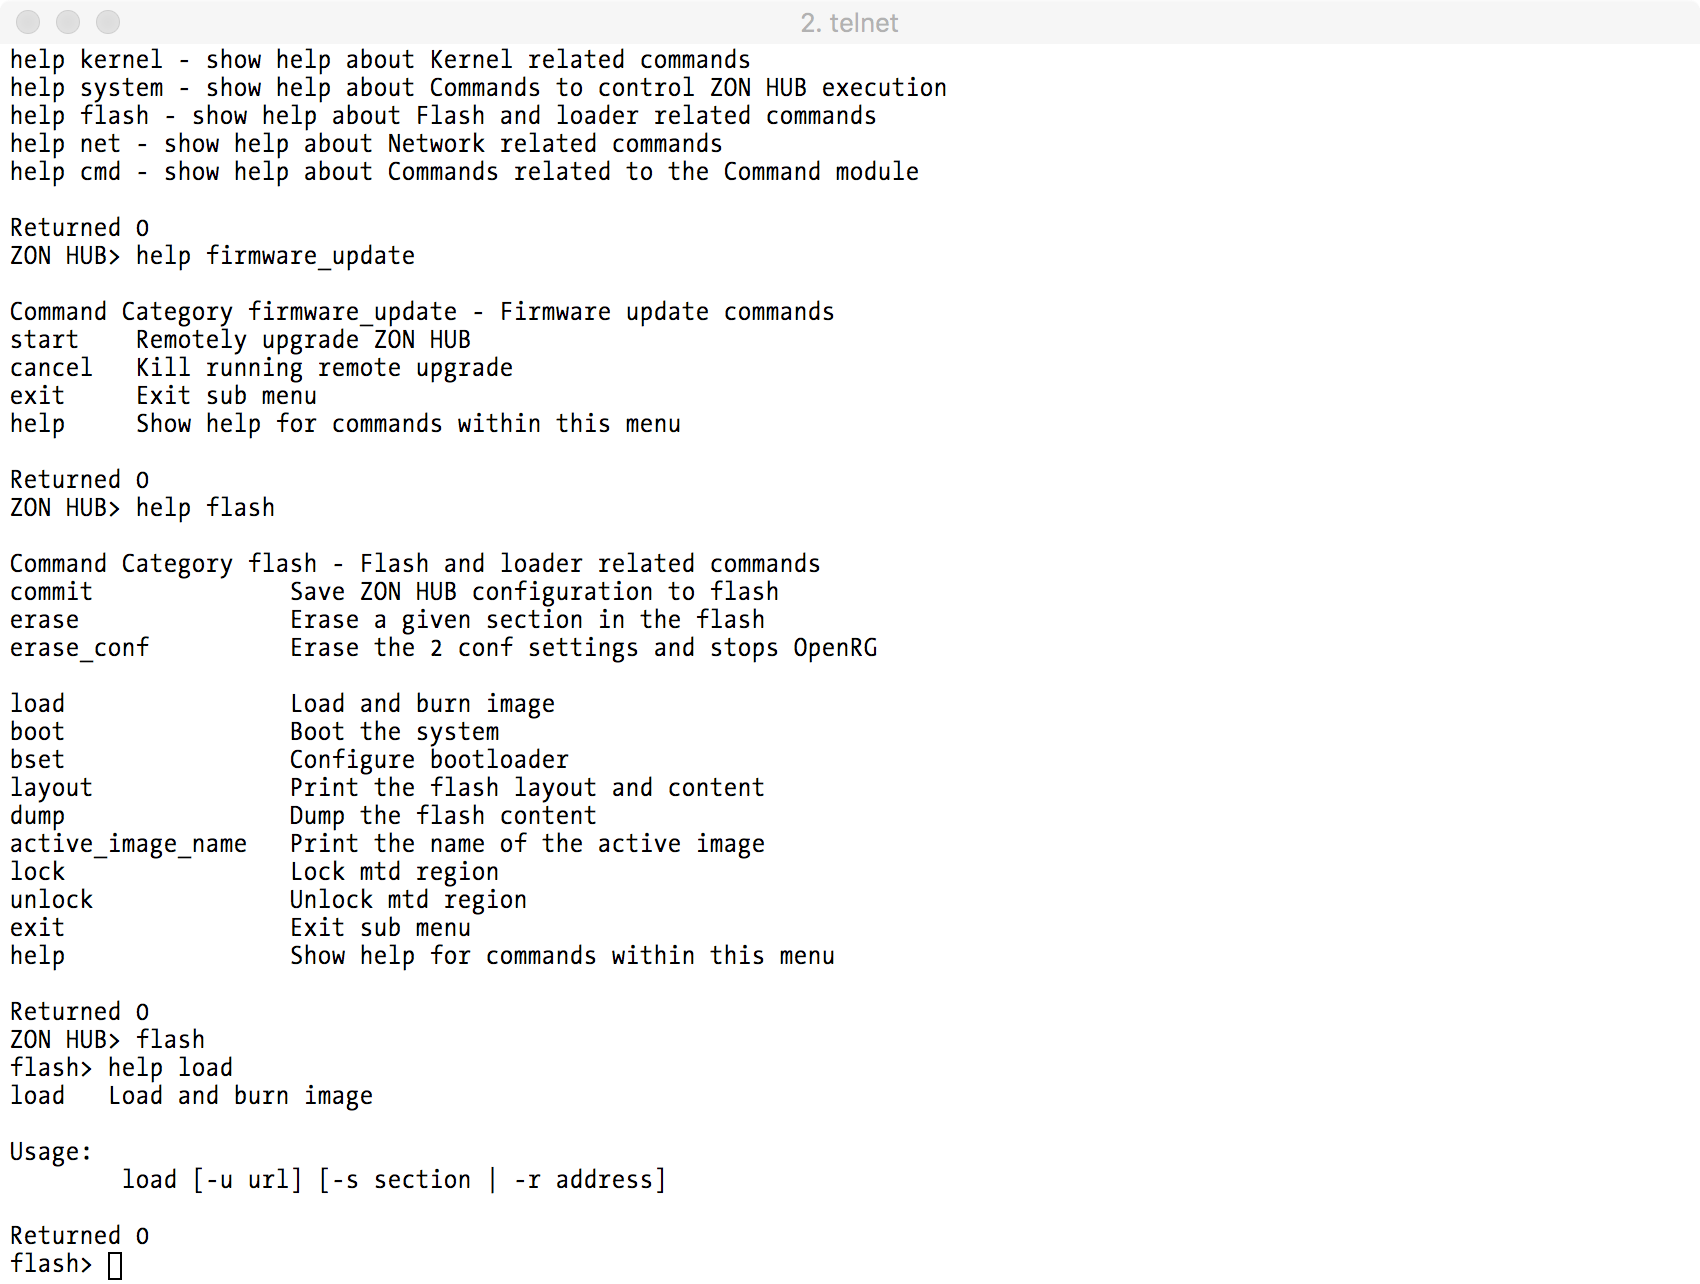
Another interesting attack vector is to update the firmware image with malicious content. For example, an attacker can first compromise a machine inside the network - let’s assume he doesn’t have access to the port 7654 - and then attack the modem with a vulnerability that gives him shell access on the modem. Judging from the flash options available at the command line interface, there is a possibility to upload a malicious firmware to the modem. Firmware backdoors are great and persistent access at the edge router that also takes care of VOIP traffic makes it a very interesting target.
From the CLI menu it is possible to flash anything into the flash sections recognized by the CLI flasher (flash menu, layout command to display the contents of the flash). And by anything I mean anything. I started a Python SimpleHTTPServer instance and I tried to flash some junk data into the two sections that contain kernel images (there are two in case one gets corrupted) and the flasher executed my orders.
flash> load -u http://192.168.1.3:8080/unicorn-0.9.tar.gz -s 5

Download completed successfully

Returned 0
flash> exit
ZON HUB> system
system> reboot

U-Boot 1.2.0 (Mar  7 2013 - 20:07:42)
PSPU-Boot(BBU) 1.0.16.22

DRAM:  128 MB
Flash Spansion S25FL128S(16 MB) found on CS0.
Flash Spansion S25FL128S(16 MB) found on CS1.
Flash: 32 MB
In:    serial
Out:   serial
Err:   serial
Press SPACE to abort autoboot in 3 second(s)
Image sections found:
2. section: type:2; magic 0xfeedbabe; counter 0xa9; addr 0x48040000
5. section: type:2; magic 0xfeedbabe; counter 0xaf; addr 0x4c000000
Looking for active section/image:
checking section 5... ok: 'Image downloaded from: http://192.168.1.3:8080/unicorn-0.9.tar.gz' 0x274eed@0x4c000000 count:0xaf
## Booting image at 4c000000 ...
Bad Magic Number
Of course that when I booted the system it was bricked in the boot loader since it couldn’t find anymore a valid kernel image to boot.
What this means is that we can modify the kernel image (found into a U-Boot uImage container) and reflash it. No code signatures whatsoever appear to exist at least on this version of OpenRG/U-Boot. As long the checksum in the openrg_header is valid everything is ok. No secure boot is great for research!
The missing piece is just how to create a new image. The uncramfs utility has the LZMA algorithm used so it’s a good starting point. The rest is reverse engineering of the missing pieces (U-Boot boots a compressed kernel image, with known headers but potentially using LZMA algorithm) and then we can finally modify the filesystem and/or kernel. At that point advanced persistency is achieved. A kernel rootkit could be introduced that modifies binaries downloaded over HTTP and insert malware on them. If it happened with Tor, it can happen with millions of routers - if the remote update and flash routines are disabled by malware we are talking about a support and logistic nightmare (assuming that we can disable the mentioned DOCSIS out-of-band update channel).
This is all theoretical but a tiny step way to be proven possible or not. There is a certificate labeled Remote Updates but I don’t think the firmware images are even signed and should be only protected by a CRC checksum or something like that. A trusted boot chain does not exist at all, as expected on a cheap mass production device, something that should remain true in the near future aggravating the security problems of all these embedded devices. Dan Geer has interesting talks regarding this exact problem (more great talks available here).
My initial goal was to understand if there were any remote management accounts and services and find a way to disable them. It is possible to disable them and ISP remote access, and also recover the passwords from all the accounts (described in the slides).
Instead of using the traditional serial console, JTAG, and default passwords techniques to gain access to embedded devices, I just went straight after the “heart” of these devices - the serial flash chip - where the operating system and remaining software resides.
Its just a different way that doesn’t involve locating headers, solder points, and other fun hardware things. It might also not be applicable to every modem/router out there. For example, check this excellent TomTom Runner smartwatch hacking series by fellow Portuguese hacker Luis Grangeia aka kossak. Direct access to the flash would probably be not as easy as in this post because of the size, and the firmware updates were encrypted.
But as long there is a traditional SPI flash chip with exposed pins we can have easy access to its heart (BGA versions as found in most recent Macs are way more annoying to get access to). With some luck someone else already created the tools we will need to unpack/extract filesystems and other contents, or else we will have to ourselves reverse engineer everything.
Have fun,
fG!